To infinity and beyond!

I have a cable jumper pattern which was, apparently, inspired by Henry VIII (it certainly comes in all sizes up to Henry), and the interesting thing about it is that it has looped cables. The bottoms of the loops are created by making additional stitches, which are then decreased again at the tops of the loops. It doesn't look too bad, but the stitches don't go smoothly all the way round the loop. At the bottom of the loop they are facing tail to tail, and at the top they are facing head to head... plus you get a certain amount of distortion of the fabric.
Even so, I thought this was still pretty impressive, until just the other day when someone pointed out that there is a better way. As soon as I saw that, I knew I had to try it for myself, especially when the person who'd pointed it out to me said it was the hardest thing she'd ever done in knitting. I am always up for any challenge involving cables. She also recommended I should use the smoothest yarn I could find, and I said "oh, that'd be a cotton... no, wait, I have a cotton/bamboo blend that's even smoother, I shall use that."
So I got out my King Cole Bamboo Cotton, which is a DK (the instructions say "worsted weight" but that is not a thing in the UK; worsted is a type of spin, not a yarn weight, and in any case I didn't see that the yarn weight would matter that much as long as one used the right needles). It's smooth and very soft. The person who pointed me to the link also said I should avoid using a yarn that was inclined to split, and I had completely forgotten that this one is rather splitty; having said that, it turned out to be not a great problem.
I worked through the instructions as given, wondering when I was going to get to the difficult bit. I didn't. This technique does require a bit of practice - my first attempt, which is shown here, is not perfect, because I got a few stitches twisted on the inner column; but it's not intrinsically hard. I'm not going to reproduce the instructions here because you can find them easily enough in the original blog post. What I'm going to do is provide a walk-through summary so you know what you're going to do before you do it, because those instructions are (necessarily) quite long and detailed.
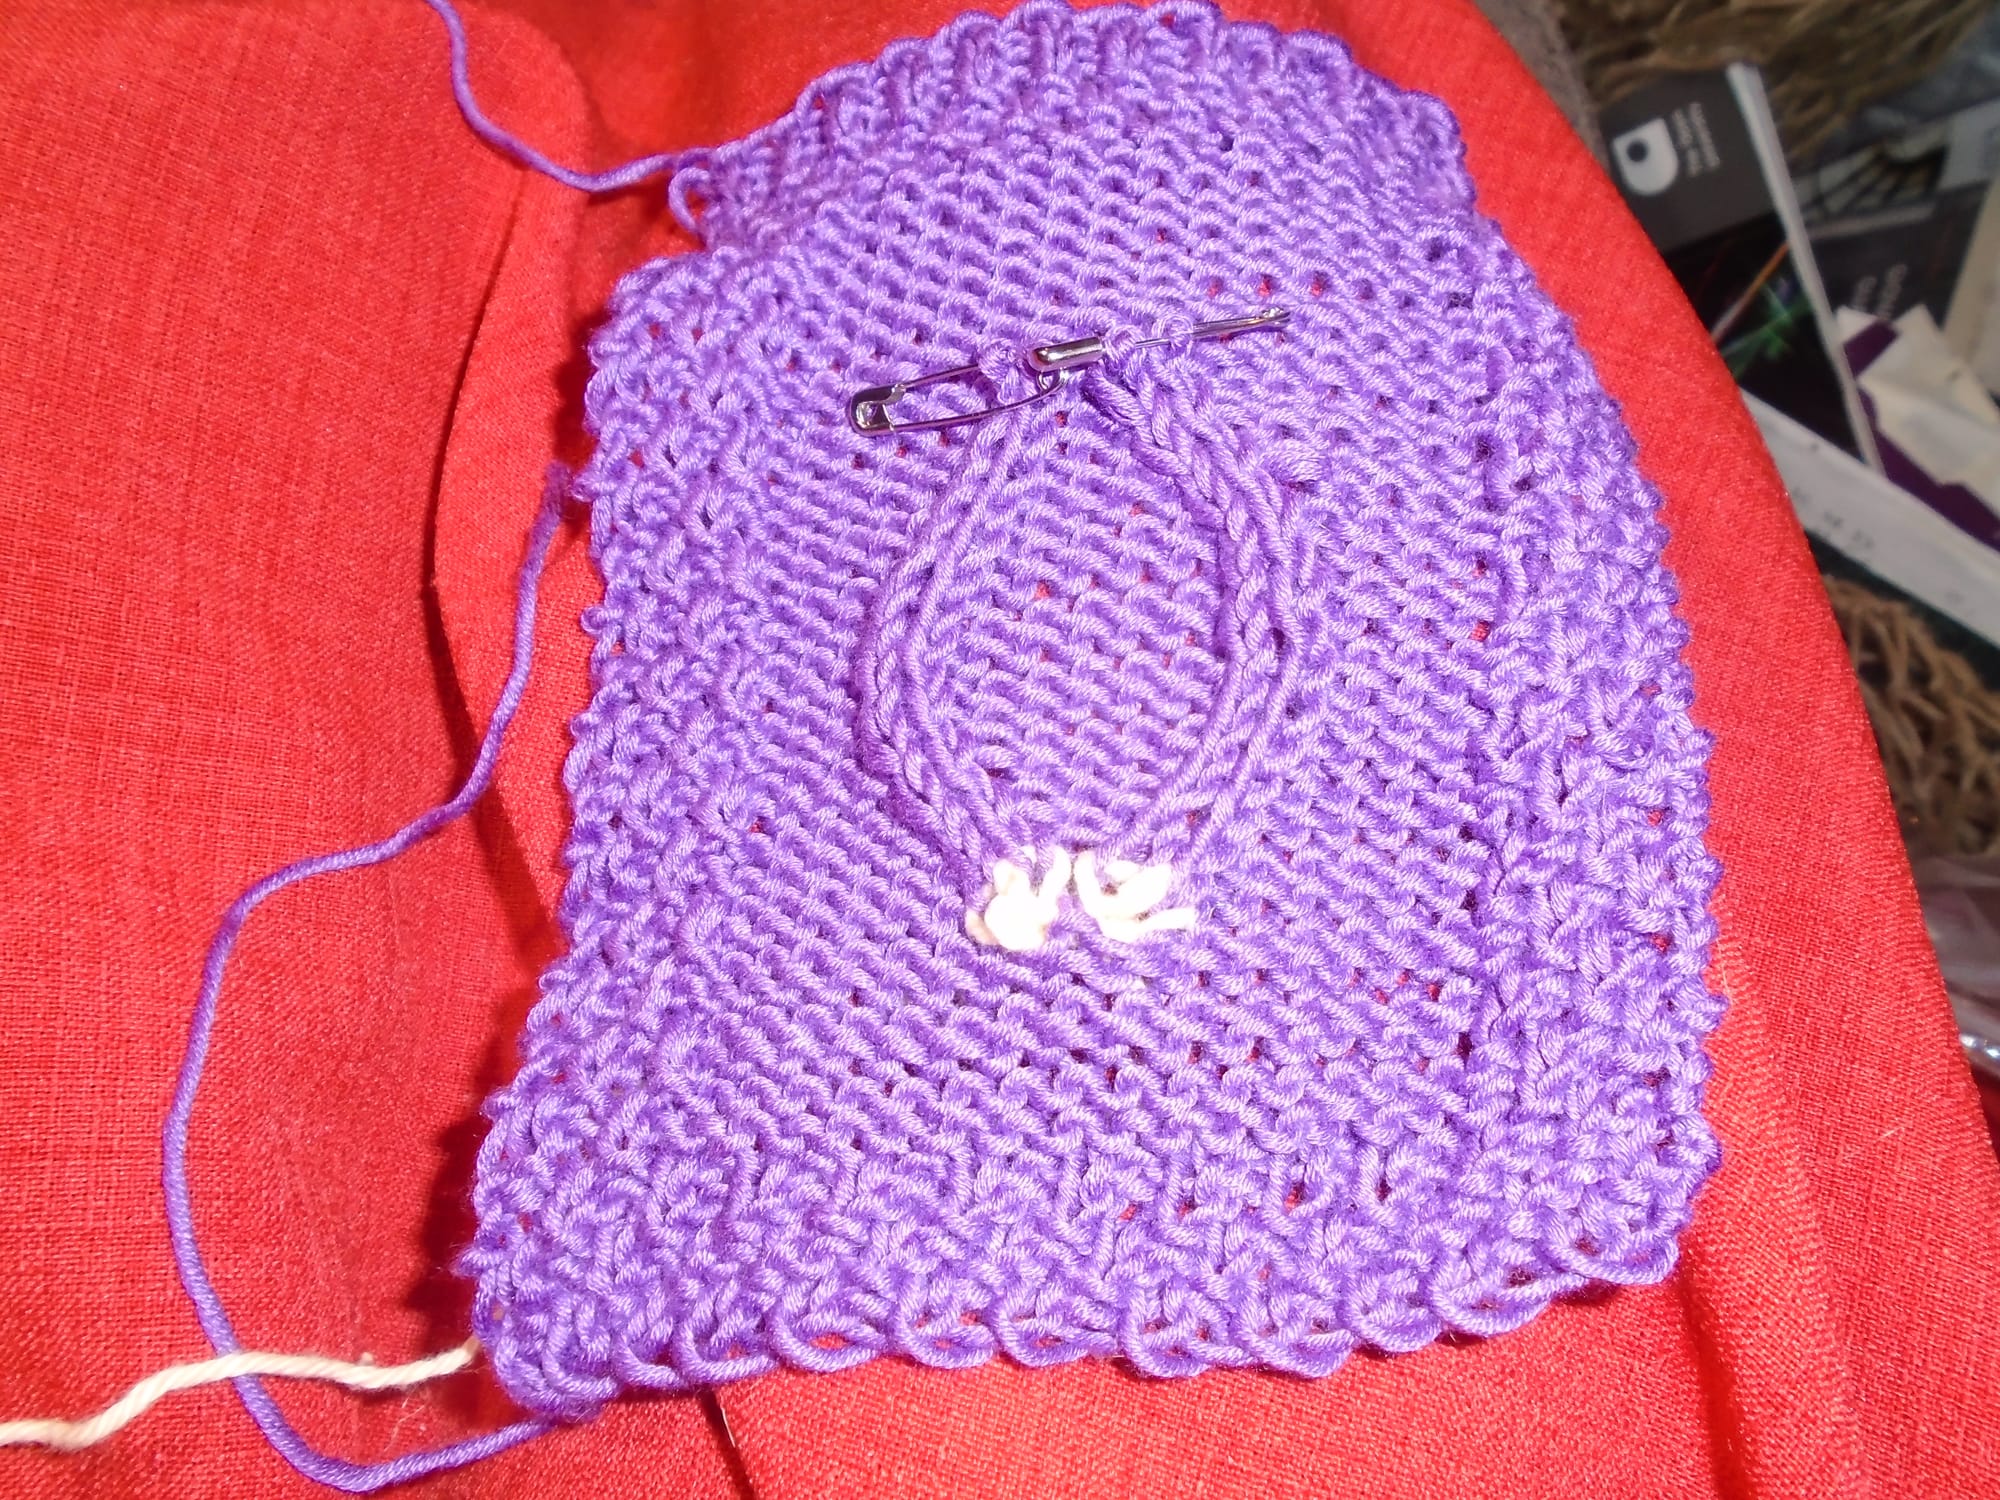
I put a border of Irish moss stitch on my sample to stop it rolling up (the instructions recommend garter stitch, but I don't much like garter stitch, and Irish moss stitch will do the same trick). It's not strictly necessary to do that, especially not for a practice sample like this one.
What you're doing here is a two-stage process. The first stage is the actual knitting, which looks like this once you've finished it:
And the second stage is what the author of the post calls the "after-knitting", which, in this case, involves transforming half of the stitches so that they face the opposite direction, so that the stitches are lying in the same direction all the way around the circle. That is very much like laddering back to fix a mistake a few rows back; if you have ever done that, you will not have a problem with this technique.
You will notice that there's a little bit of contrast yarn sitting at the bottom of what is going to be the circle in the photo I've just shown you. This is important. You start your cable stitches off on that. The post tells you that you can use either a row of four individual slip knots or a fairly loose crochet chain, so I opted for the latter, because instinct told me it would be much easier to remove at the end. (Instinct was correct. I didn't have to cut anything to get it out.) So you're not distorting the background because the number of stitches in the background never changes; the whole cable just sits on top of it, as it were. Then, when you get to the top, you anchor the tops of your cables on small stitch holders. The post recommends what it calls "bobby pins"; I couldn't recall what those were till I scrolled down far enough to see the relevant photos, and then I thought, oh, yes, kirbigrips. But safety pins will do the job equally well (and, besides, I don't have any kirbigrips).
With all that stuff in place holding your cable stitches, you complete the knitting, you cast off, and now comes the fun bit. You slip one of the outer stitches onto a crochet hook and the other one onto... again, the post says a DPN, but the cable needle you used to create the cables is in fact a lot more manageable, since you never have more than two stitches on it. Then you unhook the outer stitch on the cable needle from the stitch below it (so it's now just a loop of yarn), put that stitch that was below it and is now exposed onto the cable needle, and hook the loop of yarn through the stitch on the crochet hook, so that it now becomes a stitch again and is sitting on the crochet hook (but it now faces the opposite way). You do that all the way down, then once you've turned the bottom stitch round - the one that was worked into the contrast yarn - you anchor that on another safety pin or whatever you're using as small stitch holders, go back up to the top, and do exactly the same thing going down the inside. Finally, you graft the stitches together at the bottom to close up your loop.
Now, this definitely works, but I have some questions. The first is why you have to do it one column at a time, and the obvious answer to that is because you're using a crochet hook; so the corollary to that question is now... why are we using a crochet hook? This is, as previously mentioned, very much like a ladder-back; and I don't know how you do a ladder-back, but I do it with my knitting needles. A crochet hook is quick and easy if you're just laddering back one column of stitches (and I will use it for that purpose), but almost invariably I'm laddering back over several columns because I've made a cabling error somewhere; and you can't do that with a crochet hook because you have to re-do the cable the right way. So I am thinking, wouldn't it be a lot easier to do both columns at once but just re-knit them the other way, from the top of the cable arm that doesn't change? That would also make it a great deal easier not to twist the stitches.
Another question I have is why my loop is pointed at the top; but, if you scroll down far enough, that one is actually answered in the text. My stitches are on the tall side. (There is a link which is supposed to explain what is meant by "relatively tall", but the post it linked to no longer exists. Nonetheless, I have frequently noticed that when patterns give you a tension to work to, my horizontal tension is usually bang on or at least close enough not to matter, but my vertical tension is looser than it says; therefore I conclude that my stitches are "relatively tall".) And the writer does suggest a fix for that, which I shall try next time.
I'll be coming back to this one, I think.