Power beading
The other day, since it wasn't my food bank week and there weren't any further gas engineers or other tradespeople, I decided to have a go at those earrings I described in my previous post, the ones based on powers of 2. (The idea, at its very simplest, is that each bugle bead sprouts two more bugle beads going downwards till you get to the bottom of the earring.)
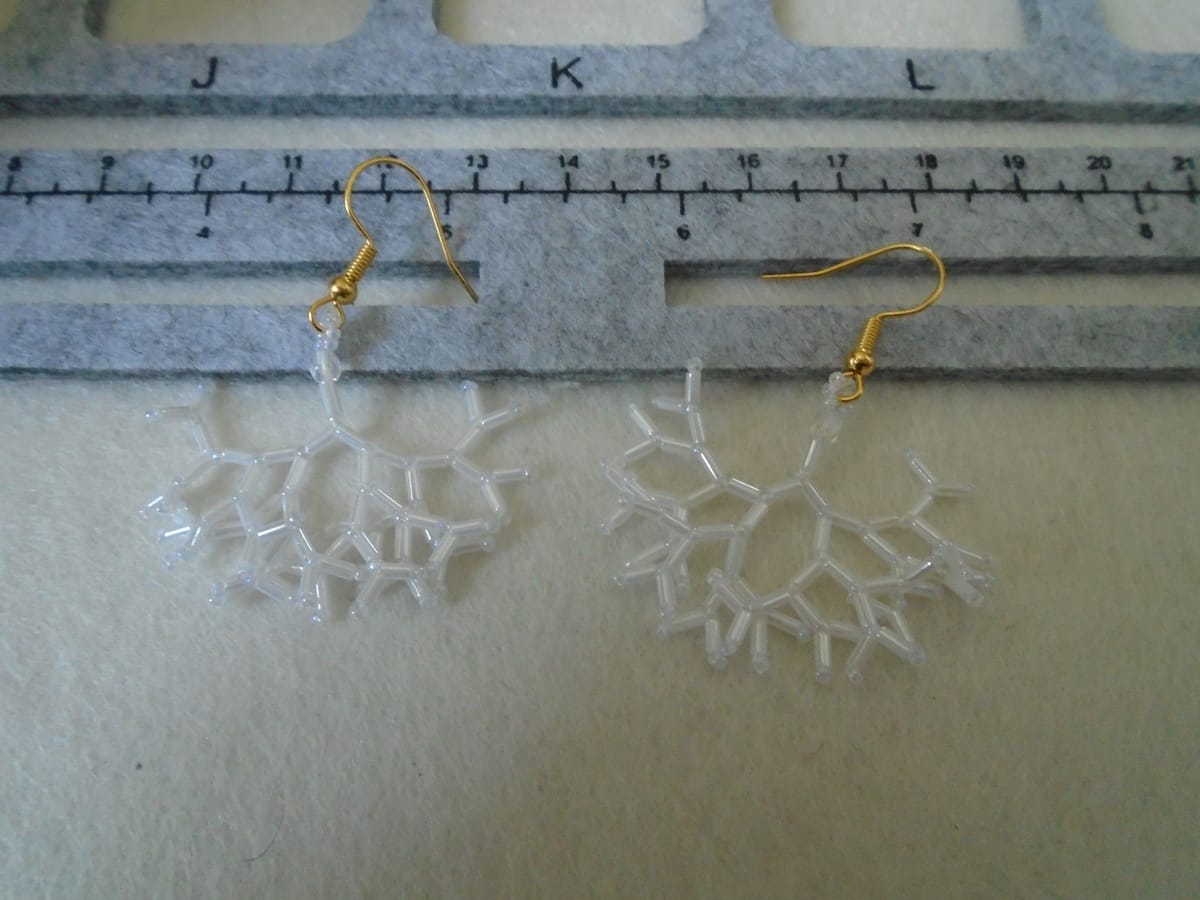
I was expecting a kind of triangular cascade. That was not at all what I got. What I got is in the feature photo, and I like it so much better than what I'd been expecting. The cascade would indeed have formed if I'd kept the thread fairly loose, but on the whole, when beading, you don't, because you don't want the thread to show; so you pull it tight, or tightish, and the bugle beads stick out at angles, so you get this wonderful fractal effect.
You can just about see from the photo that this isn't just bugle beads. I did observe in the previous post that I'd need to finish with seed beads at the base in order to turn the thread back up through each bugle bead, but once I started making them, I decided that having a seed bead underneath every bugle bead would look good. It doesn't matter quite so much for this pair because they are all white, but if I decide to make a pair with some contrast (and I like these so much that I will be making more pairs), then it's nice to have that throughout rather than just at the base of the earring. I also popped a crystal AB firepolish bead at the top, and - since this is now my standard technique rather than faffing with jump rings - there's a hanging loop made from seven of the seed beads.
Now, I warn you, these are fiddly to make. And this is me talking. If I tell you something is fiddly, you'd better believe it's fiddly, because fiddly is my bread and butter. I routinely do things that would have had my late father swearing a blue streak if he'd so much as attempted them. (He had many other gifts, bless him, but fine dexterity wasn't one of them.) Let me walk you through it, or at least walk you through far enough that the rest of the way is clear.
With the earrings I've shown you previously, you start by making a loop of beads, securing that, and then tucking in the end so it doesn't show. That gives you a nice firm base to work on. With these, however, there is no loop... and consequently no firm base. You start with your firepolish bead (it doesn't have to be that, of course; you could use pretty much anything from about 3 to 6 mm in size, but I had a bag of firepolish beads that looked great with the bugles); then you string one bugle, one 15/0 seed bead, one bugle, one seed, and so on, till you get to the length you want. The earrings shown here are six bugles long. I meant to string seven but I miscounted; in fact, I think seven would have been a bit too much, because then the earrings would have ended up twice the size and you'd have got a confusion of branches. Six is about right.
Pull the beads along to somewhere near the end of your thread. By which I mean, not too near, as I found to my cost when making the first earring; there's nothing to support the beads at the top end, so if you're not very careful they'll come off the thread. I find it helps to secure the end of the thread temporarily around something like a cable needle using a clove hitch. Now turn round and go back up the lowest bugle bead (obviously not the seed bead below it or those two beads will pop off the thread; the seed bead is there to anchor the thread). Add another bugle bead and another seed bead, going back downwards, then turn round again and go back up the new bugle bead as before. You now have a little fork at the base of your chain.
Any node with two branches coming off it is full, so now you need to go up a level; and this time the seed bead isn't anchoring anything, so you can go through both that and the bugle bead immediately above the two most recent ones. To get back down to the bottom you now need to string on two bugle beads, each with its seed bead.
And so on. Every time you get to the bottom, you go back up the bugle bead only, leaving the seed bead to hold the thread in place. Every time you get back up to a node, if it has only one branch you make a new one, but if it already has two branches you go back to the one above. And every time you start working from a higher node, the first thing you do is go all the way back down to the bottom.
Eventually you will fill up all your nodes and end up coming back out of the firepolish bead (or whatever you used) right at the top. Good show! You've very nearly finished. Now all you have to do is make your hanging loop, thread it through the base loop of the earwire as you're tightening it, thread through the loop once more to make sure it's strong enough, knot the ends of the thread firmly, and tuck the ends down through the beads (it's best to take them down two different paths, though that's not essential as long as you have a good fine beading needle).
As for getting rid of excess bead earrings, I think I may have found a solution. Well, two, if you count Awesome Asian Church Worker, who rolled up to church on Sunday morning wearing a dusky rose pink dress with a small floral print and a toning pink cardigan... and pearl earrings. I took one look at her dress and asked her if she'd like a pair of earrings, because I realised that pair I made that aren't quite burgundy would look perfect with that outfit. It turned out she would, so she's getting that pair on Sunday. However, I don't propose to inundate Awesome Asian Church Worker with earrings; instead, I found out quite by chance yesterday that there's a shop not too far away from here which sells local craft work. Including, as it turns out, earrings. So I have e-mailed them; and, as Athos is fond of saying, we'll see what and how.
You never know. It could be quite a nice little business!