On strands of purl
I was quite convinced that almost all record of my original attempt at The Embroidered Waistcoat had, like the waistcoat itself, vanished without trace in 2016. But the other day I was trying to find something in my documents folder; and, several subfolders down, there it was. An entire folder full of design work, details of materials used, and - crucially - WIP photos.
It doesn't have all the details of the process, but I do recall quite a few of them. First of all, I designed the pattern using a combination of graph paper and the computer; you'll notice that it's regularly repeating. I'm not going to do that with this one, mainly for the reason that the pattern I'm using this time has shaping darts. I don't want odd breaks in the embroidery, so I'll be shaping the design much more to the piece. But it did work well for the pattern I used the first time round (which was Vogue, and is discontinued - probably has been for quite a few years now).
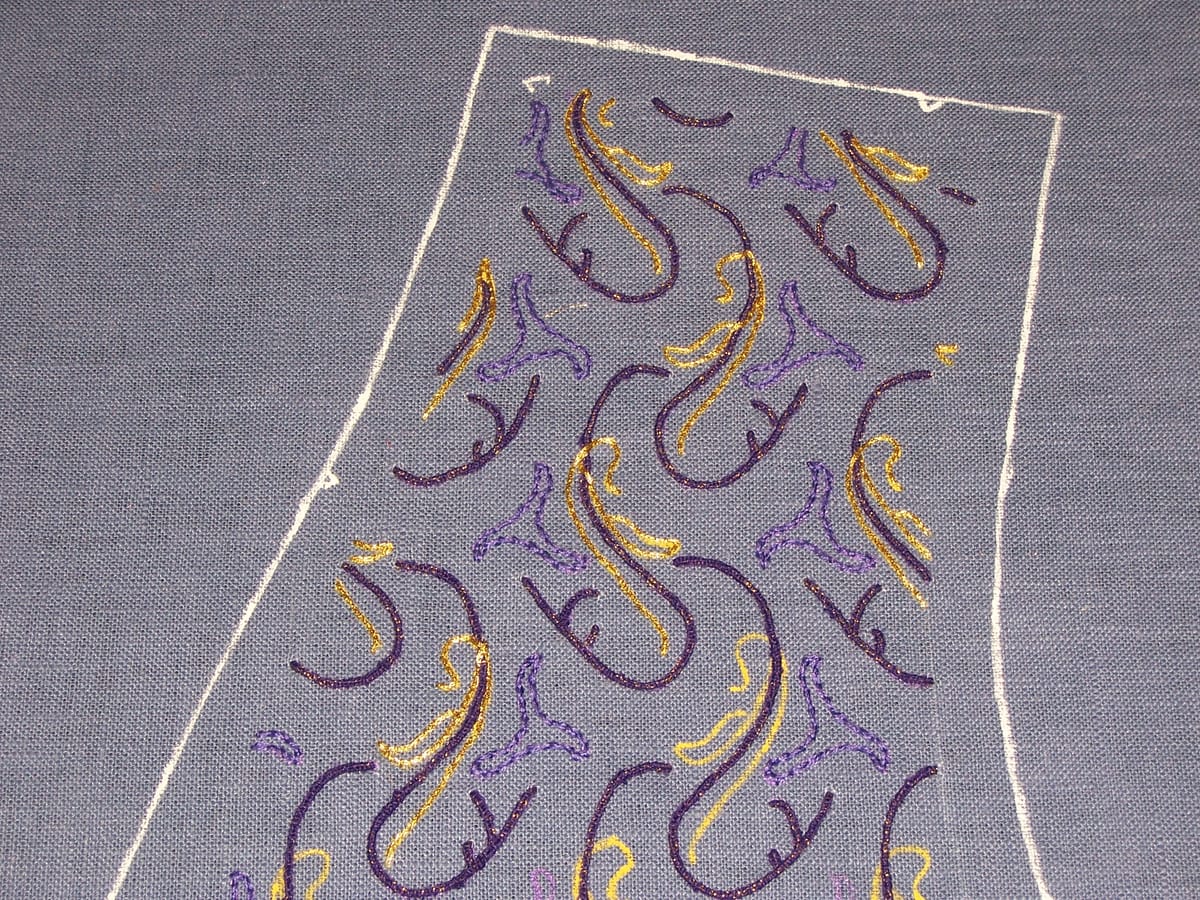
Another thing I did was... I can't believe that a) I really did this and b) it worked, but I did and it did. I actually pounced the design onto the fabric. The way that works is you prick a lot of little holes along the lines of your design, and then you brush a fine coloured powder over it; it is, as you'd expect, called "pounce powder", and I have no idea if you can still get it, but you could about fifteen years ago. It is absolutely terrifying because you think you're going to smudge it and/or the dust is going to go everywhere. But the design came through, and as soon as I had it, I set about painting all the lines on the fabric with a very fine brush. I realise this is normally frowned upon - generally speaking, you shouldn't make marks on fabric you can't erase; but in this case it was going to be embroidered over, so the lines were not going to show. As, indeed, you can see in the feature photo. While I was at it I also painted in the outlines of the pattern pieces, because there was no sense in cutting them out till the embroidery was finished. Nobody likes frayed edges.
The fabric looks very smooth in the photo, so it may have been stretched on an embroidery frame; if so, that's not like me. I usually find frames get in the way, and my tension is even enough that I don't need to use one (and I really hate hoops because they crease up the fabric). I can't honestly remember whether I used a frame on this occasion or not; I think possibly I did, and if so I expect it was because I was using some techniques I hadn't tried before. One of which was the use of gold purl. (Not real gold purl, obviously. Gilt purl. But still impressive.)
Gold purl is curious stuff (and, on that note, if anyone gets the reference/pun in the title, you have just won the Internet, because it's a moderately obscure one; I'll give you a clue - it's Tolkien, but he did write quite a lot, so that's not a big clue). It is, in essence, very fine wire coiled into a cylinder; well, usually a cylinder, but I have seen purl with a square cross-section. So you can sew it into place very easily and completely invisibly, because the thread just vanishes between the coils. I must admit, I was a bit taken aback at how easy it turned out to be to use, since there does seem to be a bit of a perception that it's difficult; but I think that's probably because it is rather fragile. If you don't have very neat fingers you can fairly easily push it out of shape by accident. This is why I regretfully won't be using it on the second incarnation of The Waistcoat; there is nothing quite like it for effect, but I don't want the poor chap to have to keep taking the thing to the dry cleaner when all the materials I'm using are actually washable. Technically, a waistcoat adorned with gold purl is washable; but it would be quite a puzzle to wash it, even by hand, without squashing those lovely coils.
There was also going to be beadwork. Quite a lot of beadwork, in fact, but I'm not sure how it was all going to go. The only thing I definitely remember is that I was going to have flowers made out of beads. It used to be possible (I'm not sure if it still is) to get long teardrop-shaped beads with the hole running along the long axis, and those make perfect flower petals; you then pop a size 8 seed bead in the middle for the centre. It is definitely possible to get teardrop beads these days, but sadly the hole is in the wrong place for flower-making purposes. I have some Miyuki Long Drop beads which are great for making jewellery, but for embroidery I'd have to anchor the fat end with a drop of glue, which is, as far as I'm concerned, sub-optimal; the hole goes through the thin end, perpendicular to the long axis. Anyway, there will be beadwork on the present waistcoat too, but probably not very similar, unless by some miracle I happen upon a good source of flower-petal beads. (As for the Miyuki Long Drops, hold that thought. I haven't given up on them. There is definite earring potential there!)
And how do I see it now? Well, I'm looking at that photo and thinking "OK, it's annoying to have to start again, but you know what? It was good practice. I think I'll be able to improve on it this time round."
God willing, that is. Assuming I don't have another unexpected visit to death's door that involves losing most of my possessions in the process...!