Hearts and flowers
It turns out that this is my 100th post; that came round quickly! It also happens to be St Valentine's Day, as if anyone could forget that fact, given the deluge of commercial e-mails that one gets. I have one company that's decided I am a woman (they have no way of knowing from my name) and is inviting me to buy a selection of vegan-leather Gifts For Him. Another company has decided I'm a man and I want to buy Gifts For Her. Ocado is hedging its bets and sending me e-mails about what I can order for the perfect date night meal. And yet another company has also decided I'm a woman, but that the person I most want to celebrate is my best friend, whom they assume is also a woman. I'm not at all sure d'Artagnan would appreciate a personalised headscarf, and, in any case, I shouldn't think he'd need to cycle very far before it blew off.
So I have cheerfully concluded that they're all crazy out there, and I'm going to talk about needlelace instead. But, in keeping with the situation (bonus points if you spot that reference), we may as well start with a heart. If you want to learn how to make needlelace, this is a very good tutorial to begin with; like a lot of things online it is American, so they don't spell "cordonnet" the way we do over here (there seems no good reason on this occasion for removing the double N from what is, after all, a French word, except that Americans are apparently mildly allergic to double letters), but that's just linguistic nit-picking on my part. I have no problems with it at all as a needlelace tutorial... though there is a reference to "muslin or calico" at one point, and I do need to tell the British reader to omit the word "muslin", or, at any rate, to substitute something more like calico. Neither American muslin nor American calico is like ours, but at least in the case of calico the weight is similar so it doesn't matter. American muslin, however, is a great deal firmer and denser than floaty English muslin, so you could use it for the purpose described in the tutorial. English muslin you could not, at least not unless you folded it over several more times.
Having said all that, I wouldn't do it in quite the same way. The way it's done in the tutorial would certainly work (I'm not quite sure why they specify covering the paper pattern with clear or blue plastic film; I used to get a semi-transparent olive green plastic film that I'd use for a similar purpose with bobbin lace patterns, to ensure they could be used repeatedly, as otherwise the pins are inclined to enlarge the holes), but it's not how I've always done needlelace. Rather than constructing a fabric pad, I prefer to draw the pattern on a piece of corrugated cardboard. This is simpler, it anchors the lace very well, and because of the construction it's easy to get a needle through it to couch the cordonnet in place.
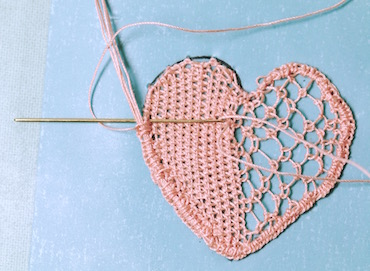
About the cordonnet... this is (you will not be surprised to learn) just one way of doing it. There are several different methods, and they all have their own advantages and disadvantages. This one has the advantage of being very easy for a beginner, plus you can stick with the same thread throughout; the main disadvantage is clearly visible in the photo. You're building your lace on just two strands of the same thread you're using for the lace, and so, no matter how careful you are, it will be liable to go out of shape; this is especially apparent at the top left.
Historically, it was very common to use something a bit thicker and stronger, not just for the edge of the piece but also to outline elements within a more complex lace design. Usually this would be some kind of cord or tape. Here's a good example of corded needlelace:
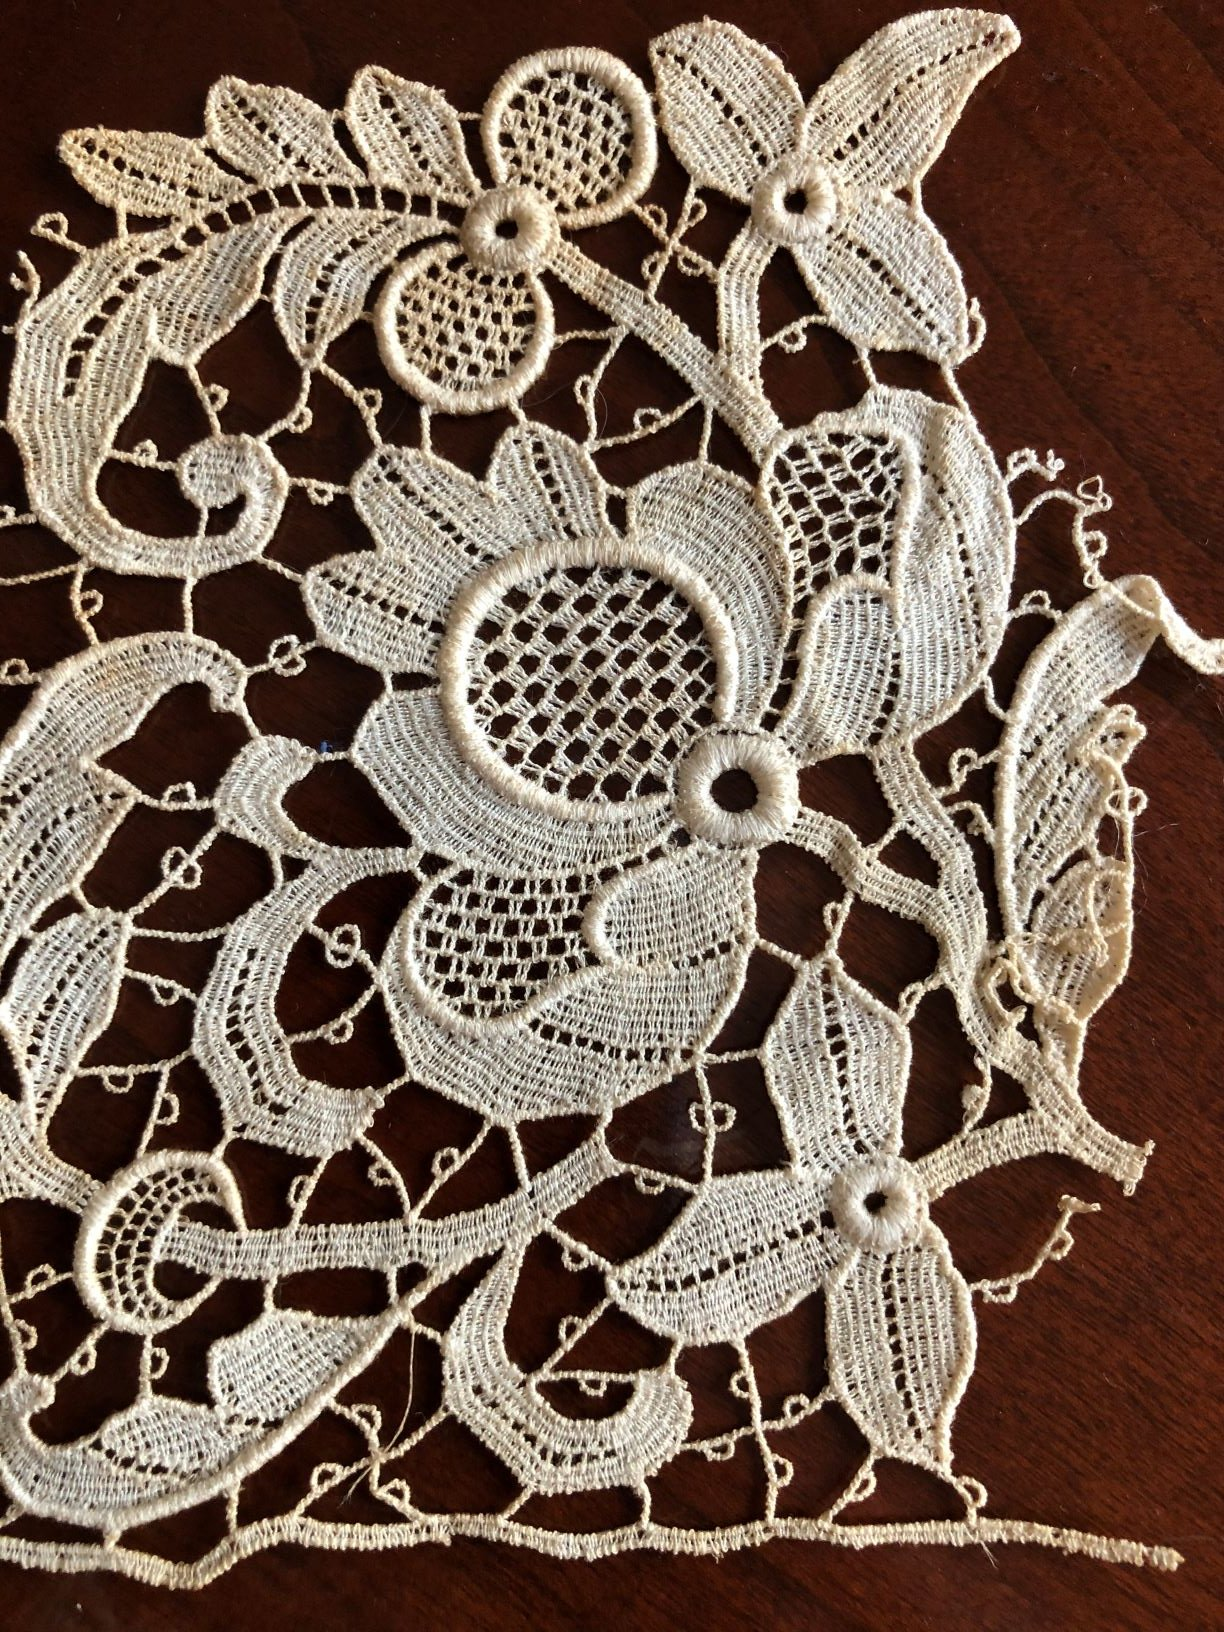
This piece uses a basic thin cord for edging most of the individual elements, and also the joining strands, most of which have either single or double picot loops. In some places this cord has been skilfully thickened; note in particular the crescent-shaped element with the open stitchwork near the bottom left of the picture. The outline tapers from thin at both ends to quite thick in the middle. It is likely that this was done by overlaying extra pieces of cord on top of the outline after the central lace stitching was finished, and then whipping over them to create a smooth taper. For the very thick ring-shaped sections, it is probable that a thicker cord was used rather than several layers of the thin cord.
Tape lace was very variable. These days, when you hear a reference to hand-made tape lace, it is probably to something very much like this:
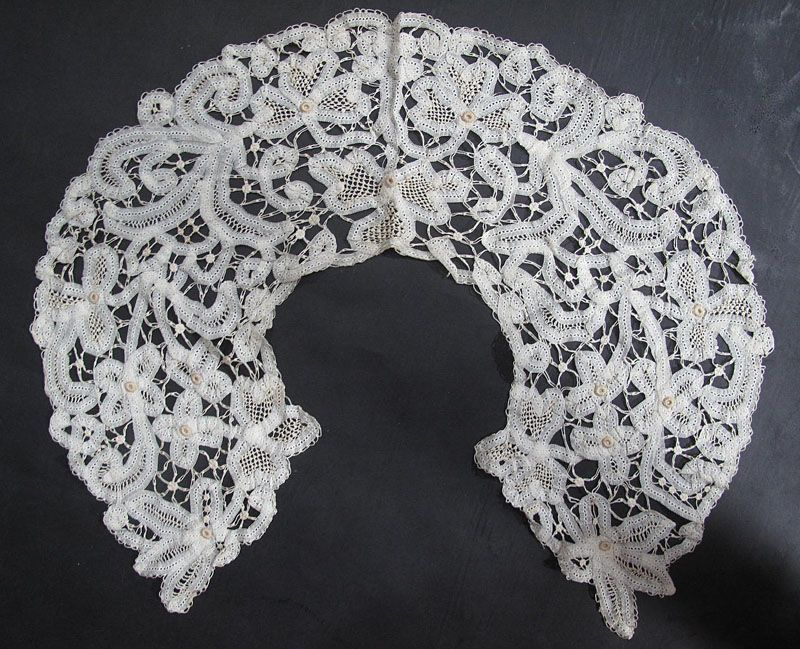
It's undoubtedly a very pretty collar, and it would still have taken quite some time to make; nonetheless, there's a lot less lace stitching here than in the corded lace piece shown above. The tape itself, with its row of little broderie anglaise eyelets, is doing most of the work. I don't especially like doing this kind of piece; yes, I've tried making lace with wide tape, and no, I probably won't do it again, especially now that I have Gisele and can make good quality linen tape only 3 or 4 mm wide. The challenge with tape, and in particular wide tape like this, is getting it to lie flat. Occasionally you can just fold it back on itself, and in fact you can see that this has been done for the long petals at the lower front of the collar; but what you usually have to do is run a gathering thread along each side of the tape and then tighten very selectively. It's a bit of a nightmare, honestly.
I could not find a good authentic example of Venetian tape lace, and in any case that tended to be so complex that it might have been hard to explain what I was talking about; but I did find this, which is very much more the kind of tape lace I'd consider making, and it is an extraordinarily good close-up.
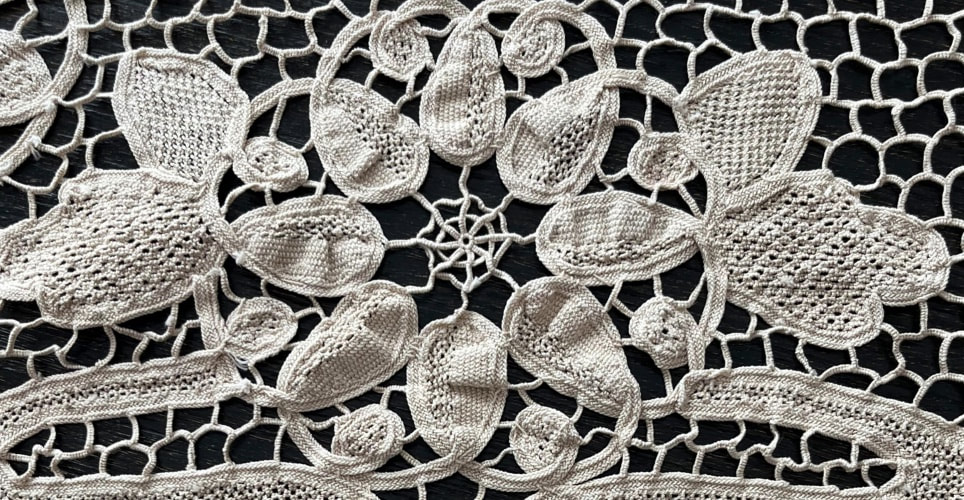
This is so clear that you can see the structure of the tape being used. It's a braid. It's difficult to gauge the scale here, but if you look closely you can see the little anchoring stitches holding the eight petals together where they touch. Assuming that's regular sewing thread, I'm going to guess that this photo is about actual size. So the tape is about the size I could get using the fine linen on Gisele. As you see, it's totally different from the lace collar above; here, the lace stitching is taking centre stage, rather than the tape that's holding it all together.
Oh, and the other thing about tape lace, as distinct from lace made with an integral cordonnet or a separate thicker cord, is that you don't couch your tape onto whatever you're using for backing. You just sew it in place with a line of temporary running stitches. That is one of the reasons I would, all things being equal, prefer to use a narrow tape rather than a cord to edge my lace; because the anchoring stitching goes up the middle of the tape, you're not sewing anywhere near it, so you're not going to get it caught in your lace and have to pick little bits of it out with a pair of tweezers. (Don't ask me how I know about that, all right?)
Anyway. I am thinking I may make a version of that little heart. Granted, it'll use narrow tape or possibly lucet cord rather than an integral cordonnet, and it'll be supported on corrugated cardboard rather than a folded pad of calico, and I don't expect for a moment I'll use the same stitches (although, for various reasons, I do like a heart divided vertically, so I'll probably keep that idea), and it won't be pink... but, other than that, it'll be pretty much exactly the same!