Full circle
You can buy patterns for full circle skirts. Or you can design your own, because that is really not hard. I'm not sure exactly when I wrote these instructions, but I found them the other day and they're worth posting here.
How to design a circular dance skirt with switched bias
- You will need: ordinary squared paper; squared pattern paper; compasses; some means of drawing arcs with a large radius; set square; pencil; pen; tape measure; calculator; eraser; tracing paper (optional).
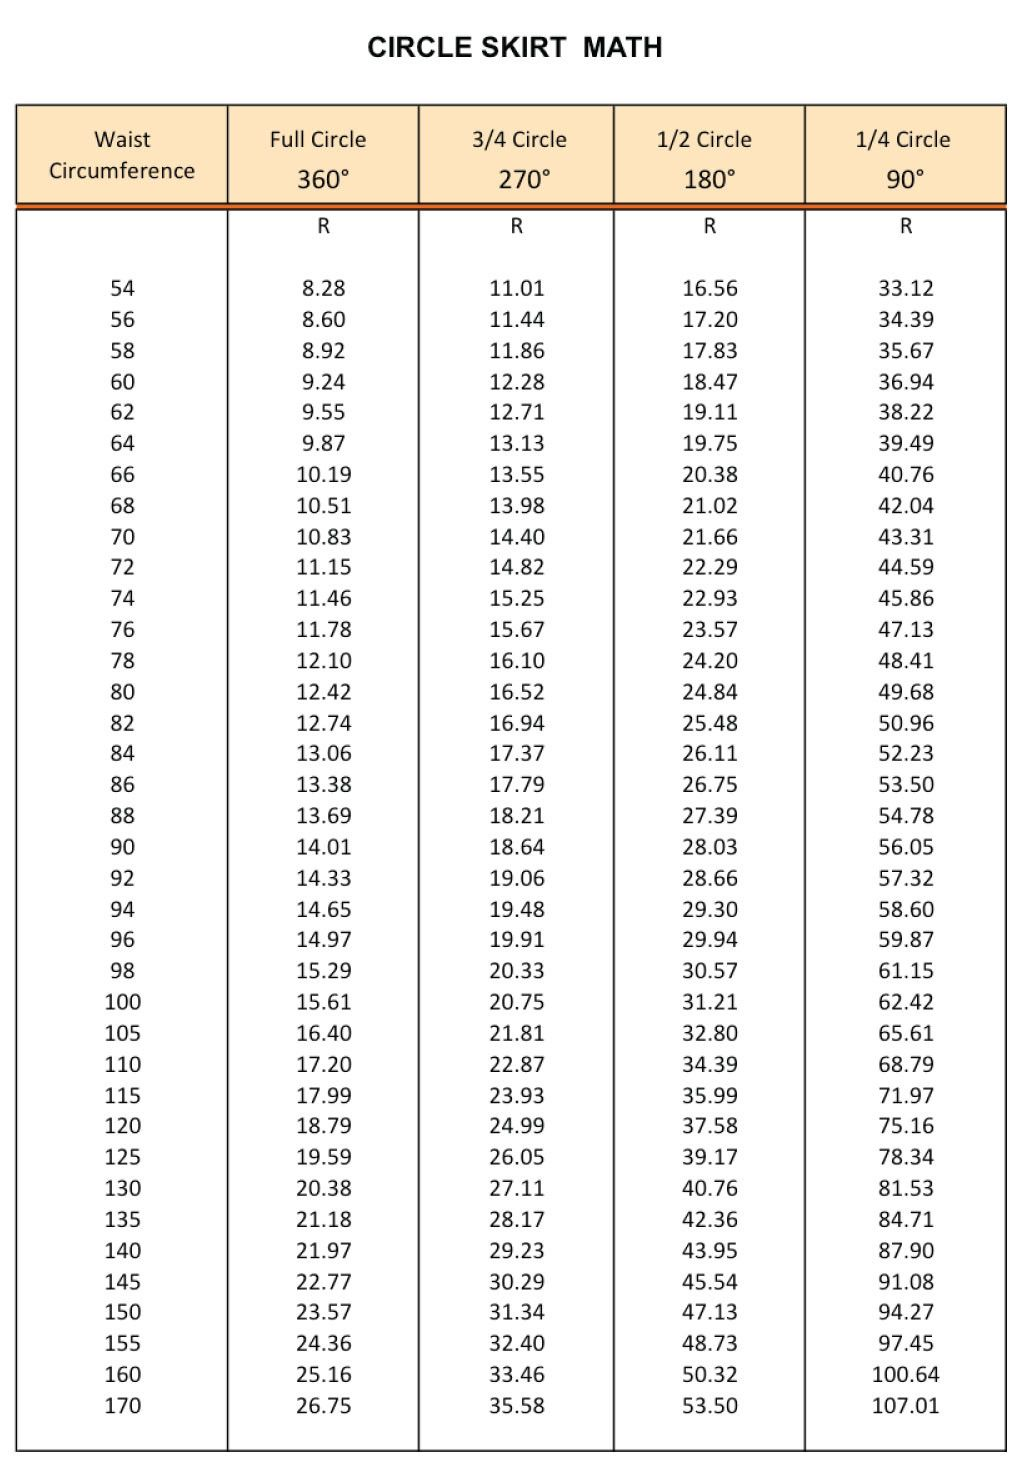
- Take an accurate waist measurement and divide it by pi. Add 3 cm for the waistband seam plus ease, then the required length of the skirt, then whatever amount you need for the hem. (I would personally recommend using bias binding, for which you will need only about half a centimetre.) This is your radius. So if your waist measurement is 60 cm, you would divide that by pi to get 19 cm (to the nearest half a centimetre); add 3 to get 22; and then add your skirt length and hem allowance.
- On your squared paper, draw a circle using whatever scale is most convenient. You’re doing it like this because you’re only going to want part of the circle, and if you drew the whole thing out full size on your pattern paper it would waste a lot. Draw a second concentric circle at the waist radius plus 1.5 cm (in the above example, that would be 19 + 1.5 = 20.5 cm).
- Now divide your inner circle into six or eight equal parts with a pencil, using the grid to help. If you’re doing this for the first time, I recommend eight, as it makes the next step much easier.
- Rotate the markings so that the centre of one of the arcs is perpendicular to a radial grid line. If you’ve divided the circle into eight, then all you’ll need to do is divide each arc into two so that you have sixteen divisions in total, and then rub out the old dividing marks. If you’ve divided it into six, trace the circle and markings, and rotate over the original circle, aligning with the aid of a set square until the divisions are where they should be. Mark the new divisions in pen. You now have the fabric aligned on the straight grain at the waist.
- Draw radii out to the outer circle from the new divisions, using a pencil.
- Rotate the markings on the outer circle by 45 degrees. If you’ve divided the circle into eight, once again that’s simple – just divide each arc into two as before (the new markings will match to the grid). For six sections, you’ll need to use tracing paper and a set square again. Now the fabric is aligned on the true bias at the hem.
- Use the set square to draw short perpendicular lines from the markings at the waist and hem. (You need only do this for the markings bordering the section you’re going to use, which is the one aligned on the straight grain at the waist.)
- Connect the short perpendicular lines with a flowing curve. This should be the same on each side of the scaled pattern piece; you can use the grid to help, or you may find it easier to use tracing paper.
- Mark round this piece in ink. Scale it up onto the pattern paper, adding 1.5 cm seam allowance along each of the curved sides.
- Finally, design your waistband. You will need a rectangular pattern piece 6 cm longer than the waist measurement. The width should be twice the desired width of the finished waistband plus 3 cm. This will give you a waistband with a 3 cm overlap for a button and buttonhole, hook and eye, or other fastening of your choice.
So this isn't quite your standard full circle skirt. In fact, I can't find anything else like this online; there's a whole slew of circle skirt patterns, but they all have panels with straight edges, whereas these are deliberately curved to get the grain straight at the waistline (where you need it to be stable) but on the true bias at the hem at the centre of each panel (where you want maximum swish). As mentioned in the title, this was originally designed as a dance skirt, but it wasn't for myself so I never made one, therefore I can't show you a photo of one of the panels.
Re-reading this, I notice it does assume a fair bit of general sewing knowledge, not to mention basic mathematical savvy. If I were planning to give these instructions to a complete novice, I'd rewrite them a bit. For instance, point 3 isn't especially clear unless you already know what you're doing. In step 2 you've just found the radius of your outer circle, which goes around the hem of your skirt; step 3 should really tell you to draw a circle using this radius, scaled down to fit your squared paper, and then to scale down the waist radius by the same amount. That's all implied but not clearly stated. And step 11 blithely assumes you know exactly how to do a waistband provided you have the required dimensions; well, yes, you do if you've done a reasonable amount of sewing, but I think I should have been a bit more specific there. (Also, it's quite fashionable these days to treat the waistband as a single layer; you just fold it in half and stitch it in with a single seam. I do not encourage this practice. OK, it works all right if you have an overlocker, because then you can just finish all three layers together, but why have them sticking out on the inside of the skirt in the first place? I'm all for the traditional technique of sewing it up on one side, folding over, and then slipstitching in place on the inside so that nothing shows anywhere.)
I'll probably rewrite it at some point; but in the meantime, with the extra clarification provided here, I think it's probably still useful. At any rate, I hope so.