Educated guessing
As I mentioned last time, I needed to design at least two more styles (ideally more, but certainly two to be going on with); and I ended up doing that on Monday. You see, I was also cutting out Alice's pinafore, but, as I've said before, I can't do that all in one go. I have to do it in very easy stages, so it tends to take me all day. And during the periods when I need to sit down and rest, well, naturally I may as well get the beads out; so that was what I did.
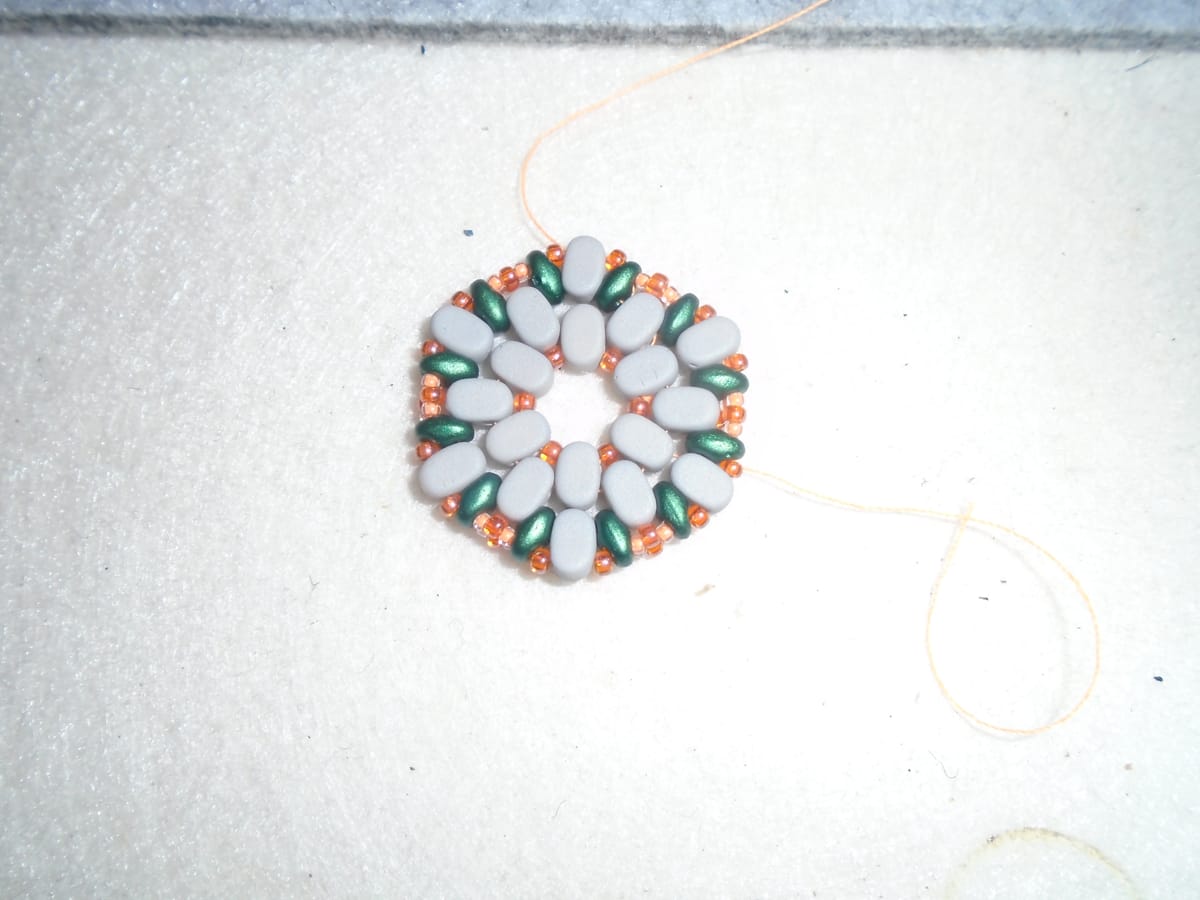
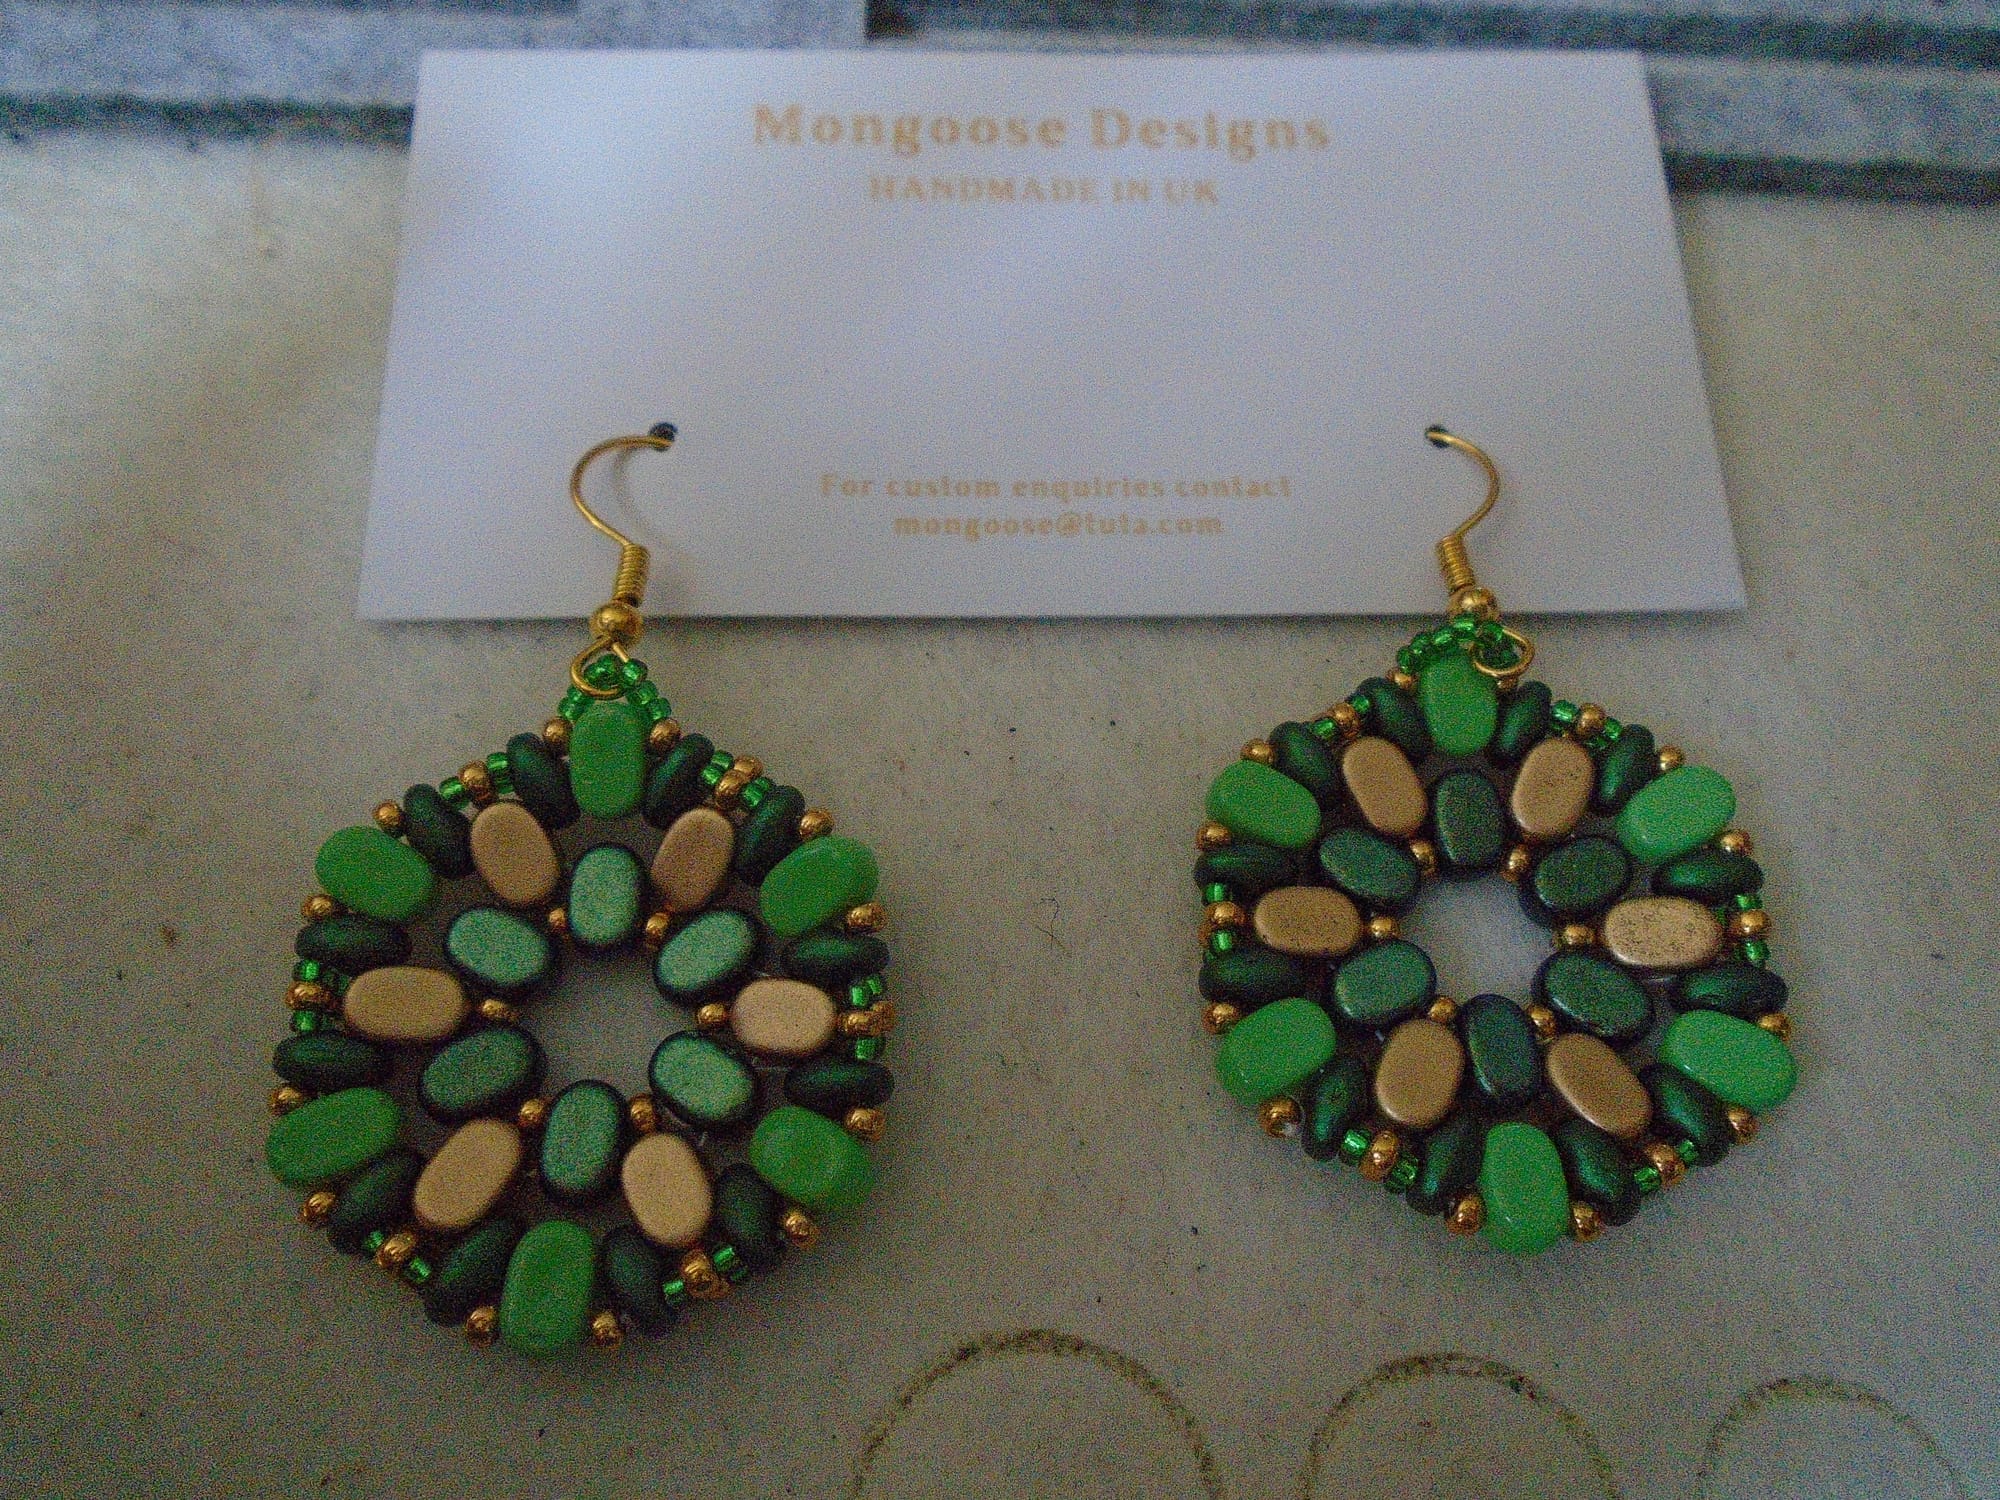
This hexagonal thing in the photo was my first attempt, and it came together astonishingly well; I didn't have to put too much thought into it. The brief was basically to use those oval beads. They are called Lipsi Par Puca, they come in a range of colours (but those boring light grey matte ones are quite useful because you can paint them), and they're used in the star earrings; thinking I was going to be making a lot of stars, I've just ordered a boatload of Lipsis, so I needed to find another way to use them. Lipsis are actually quite fun because they're double-hole beads (as are the green ones, which are called SuperDuos); double-hole beads are great for constructing shapes like this. The only thing is you do have to remember to check both holes when you're stringing one into place. You do occasionally, especially with the Lipsis, get a bead with a dud hole, and it's not always obvious just from looking at the bead. If you don't give both holes a quick poke with the needle before you string it, you will have to do a lot of unpicking, which is tedious. Oh, and you'll also notice I've used orange thread; that's not to go with the orange beads - it's just that good beading thread costs at least five times as much as ordinary sewing thread (because it's stronger and doesn't tangle anything like so easily), so you don't use it for noodling about. The orange thread came in a pack of neons. I'll probably use the yellows, greens, and fuchsia at some point, but the orange is unlikely, so I may as well use it for things like tacking... and bead design.
Now, obviously, those Lipsis don't all have to be grey. Or even the same colour. You can do this sort of thing:

Or, for that matter, this:
Or this:
Now, I did say I'd ordered a boatload of Lipsis, but they haven't actually arrived yet. All this is just what I had. So at this point I decided that if I made any more in this style right now I'd be rather struggling for Lipsis, and therefore I'd better design something else. But I didn't photograph the template this time.
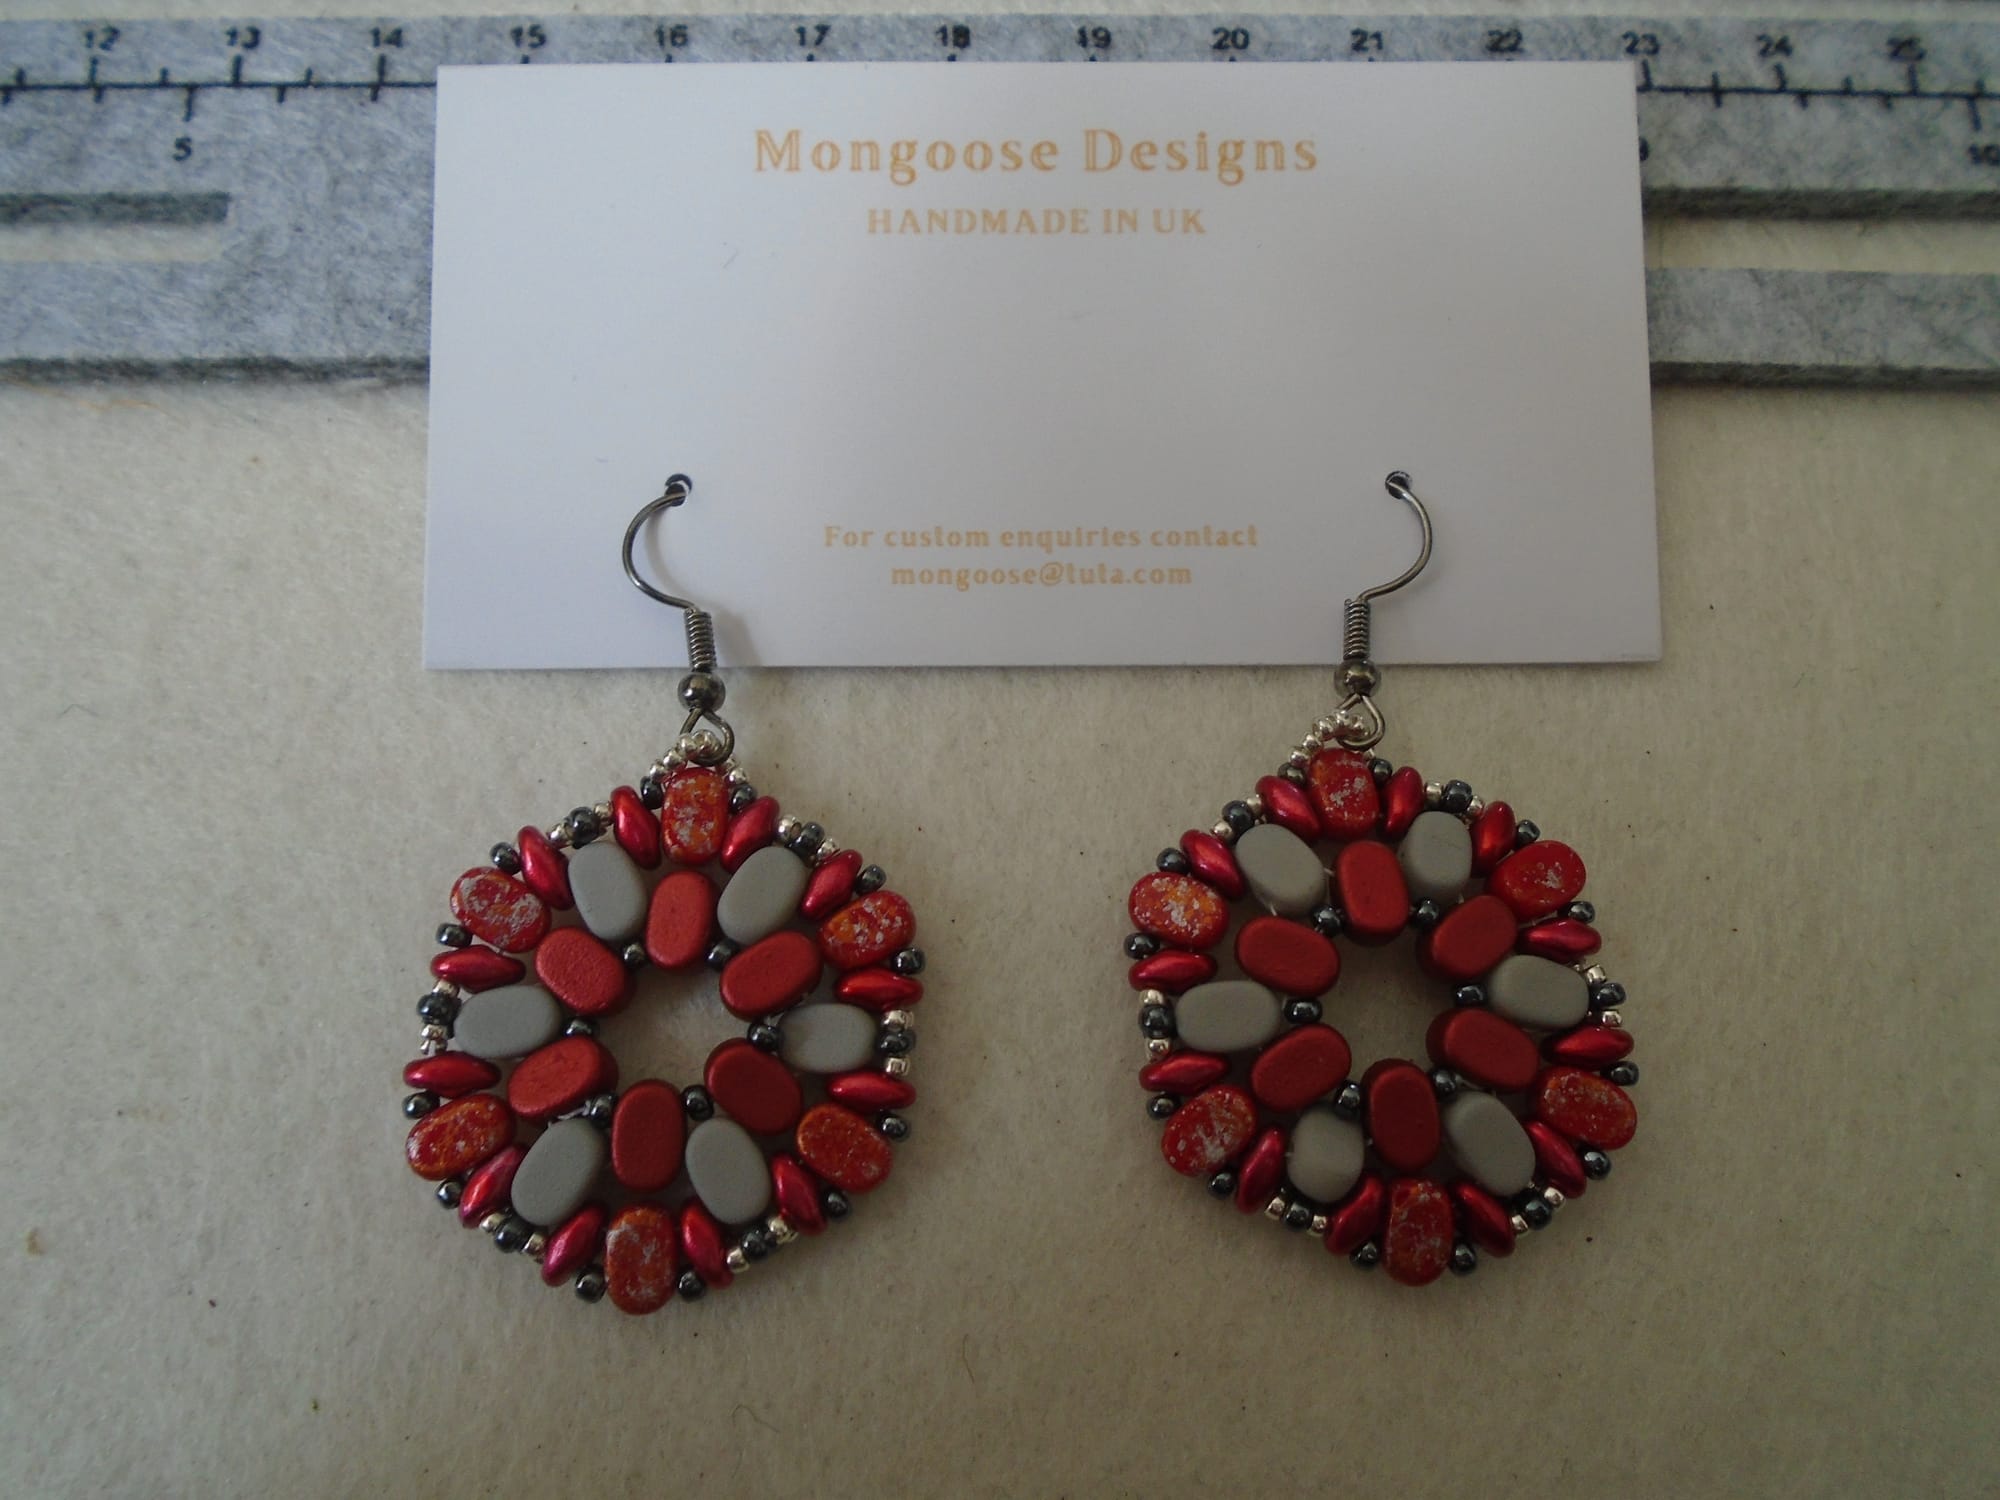
Why not? Because I liked it so much I immediately decided I was going to make an actual pair of earrings like that, and therefore there was no point. So you just get to see the earrings themselves. Here they are, for all your 1920s flapper girl needs. I must admit I wasn't consciously going for the 1920s look, but it just happened anyway, which is probably why I like this one so much. I am a bit of a sucker for that kind of style... well, all right, not the flat chests. That'd hurt.
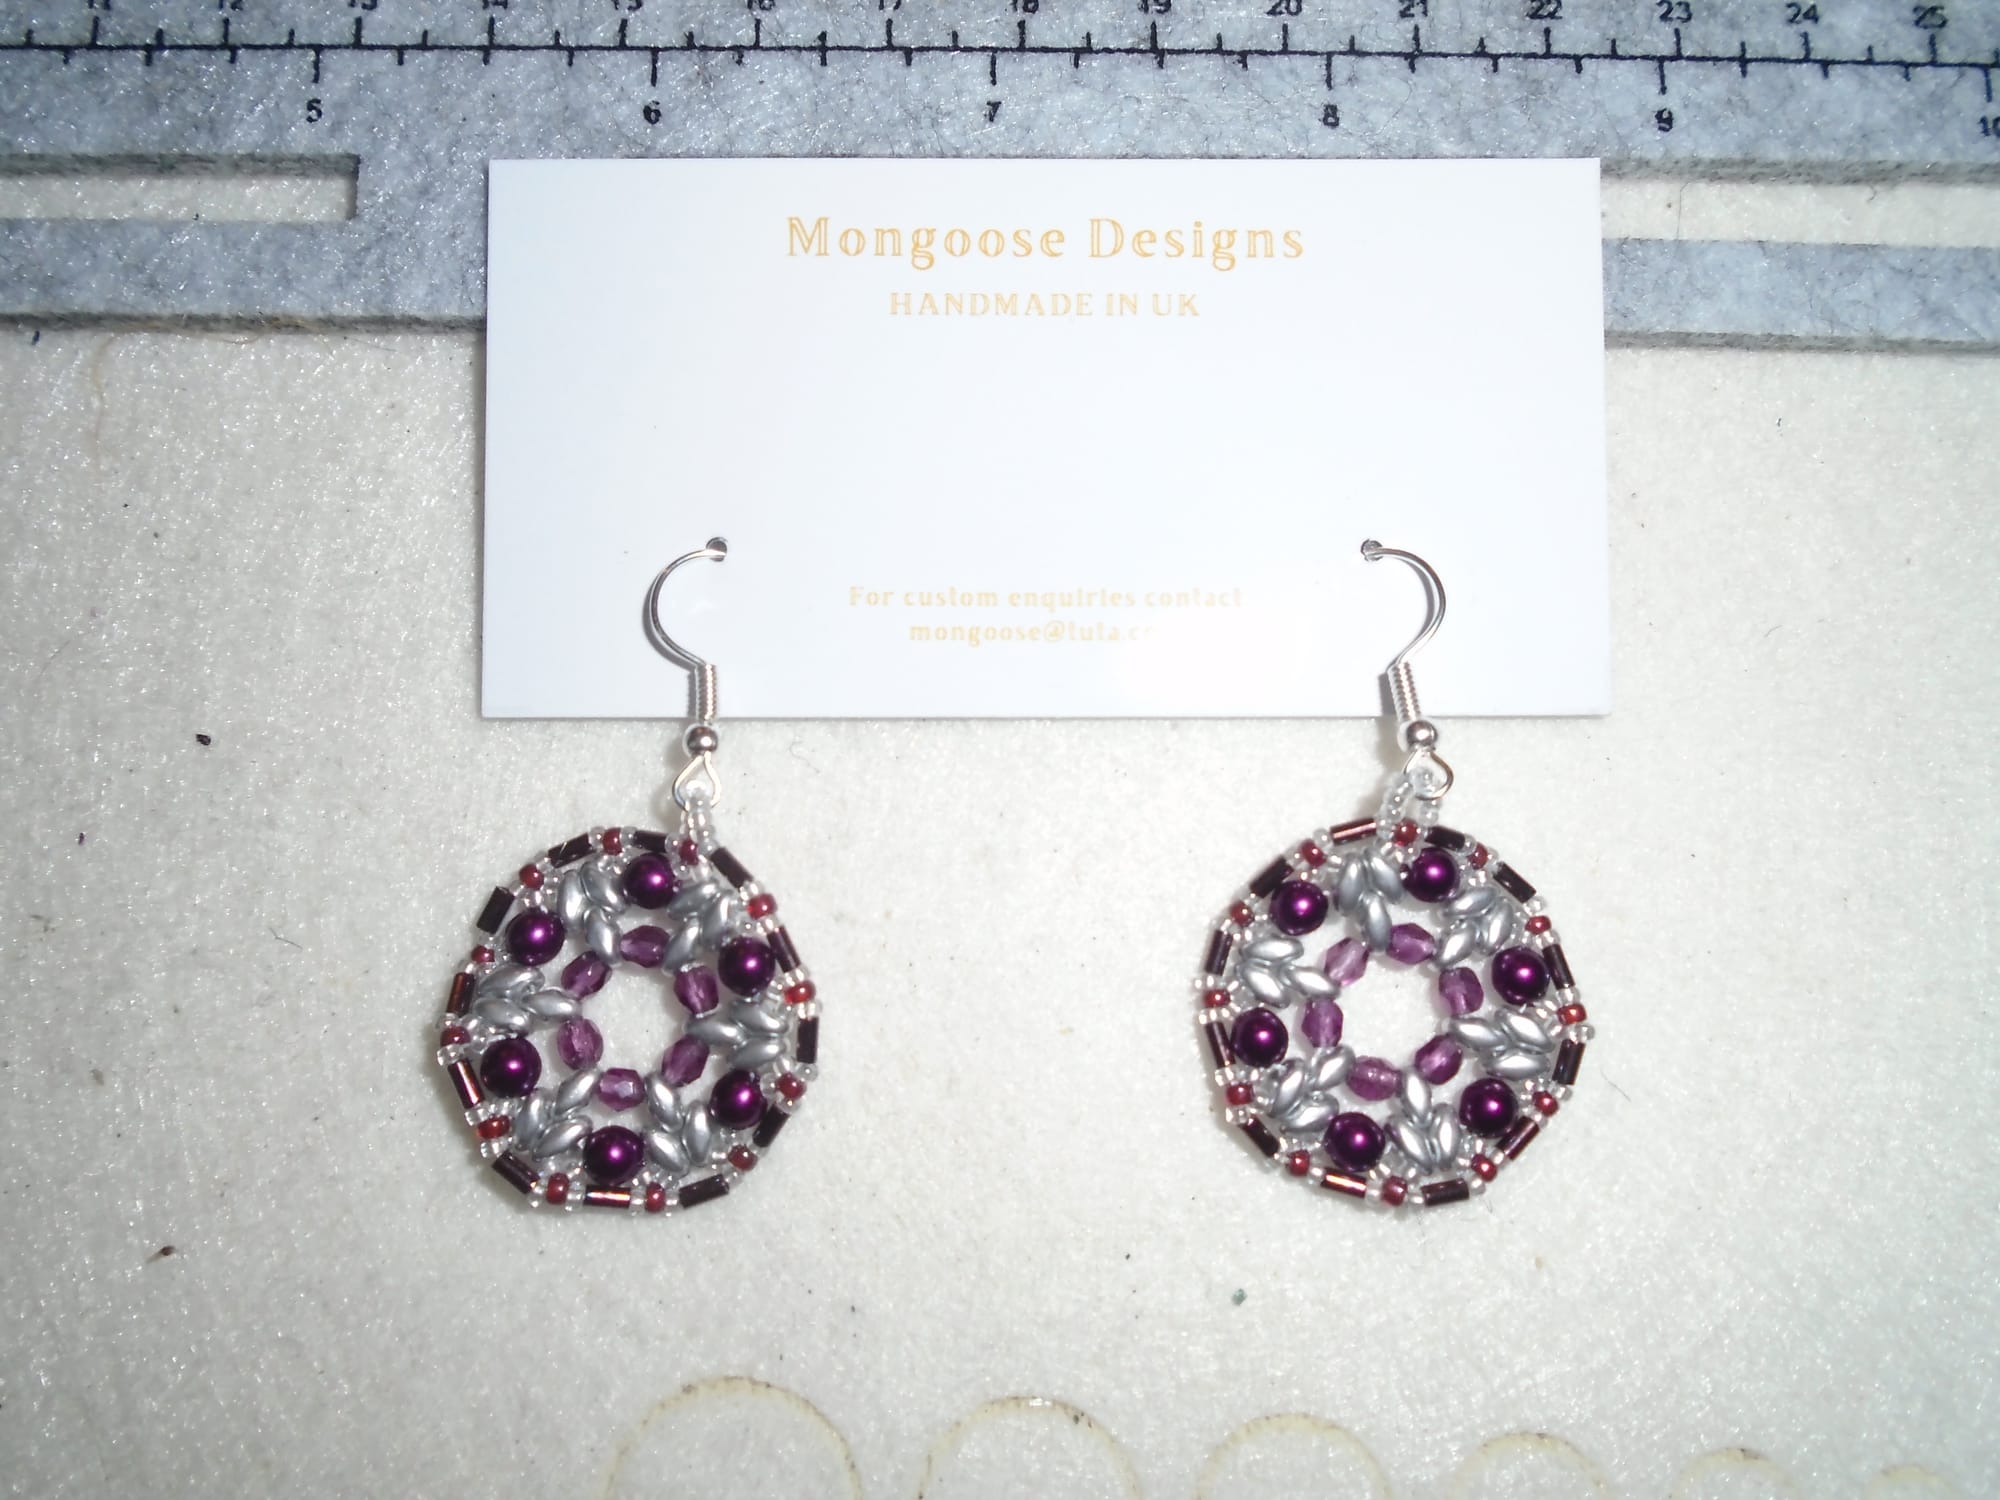
See those silver beads making the little trefoil shapes? Those are MiniDuos, which are the little cousins of the SuperDuos. The beads in the centre are Czech firepolish (why, yes, I do like those rather a lot); ironically the colour is called "Amethyst", and that's what it looks like in the photo, but it isn't. Then we have 4 mm Czech glass pearls, 3 mm bugles, and the inevitable 11/0 and 15/0 seed beads.
This one, I have to say, took a lot more trouble. I knew I wanted to achieve those trefoils, and I also knew I wanted to use the pearls. Initially I eyeballed the space and got it a bit wrong, so for my first attempt I started with a ring of eight firepolish beads and eight MiniDuos, rather than six of each as shown here. With the angle being smaller, I soon found that the disc bent all over the place (with six it still tends to bend a little, but it probably bends less than with any other number). I did think of trying seven - odd-numbered symmetries are cool - but I suspected that would still be too many, and I was right. I took the whole thing out and re-did it with six. Even then, I feared that it was going to be a dreadful faff, because the beads making up the paired leaves of the trefoils kept flopping towards the centre rather than pointing neatly outwards; but as soon as I switched to proper beading thread, that problem almost disappeared.
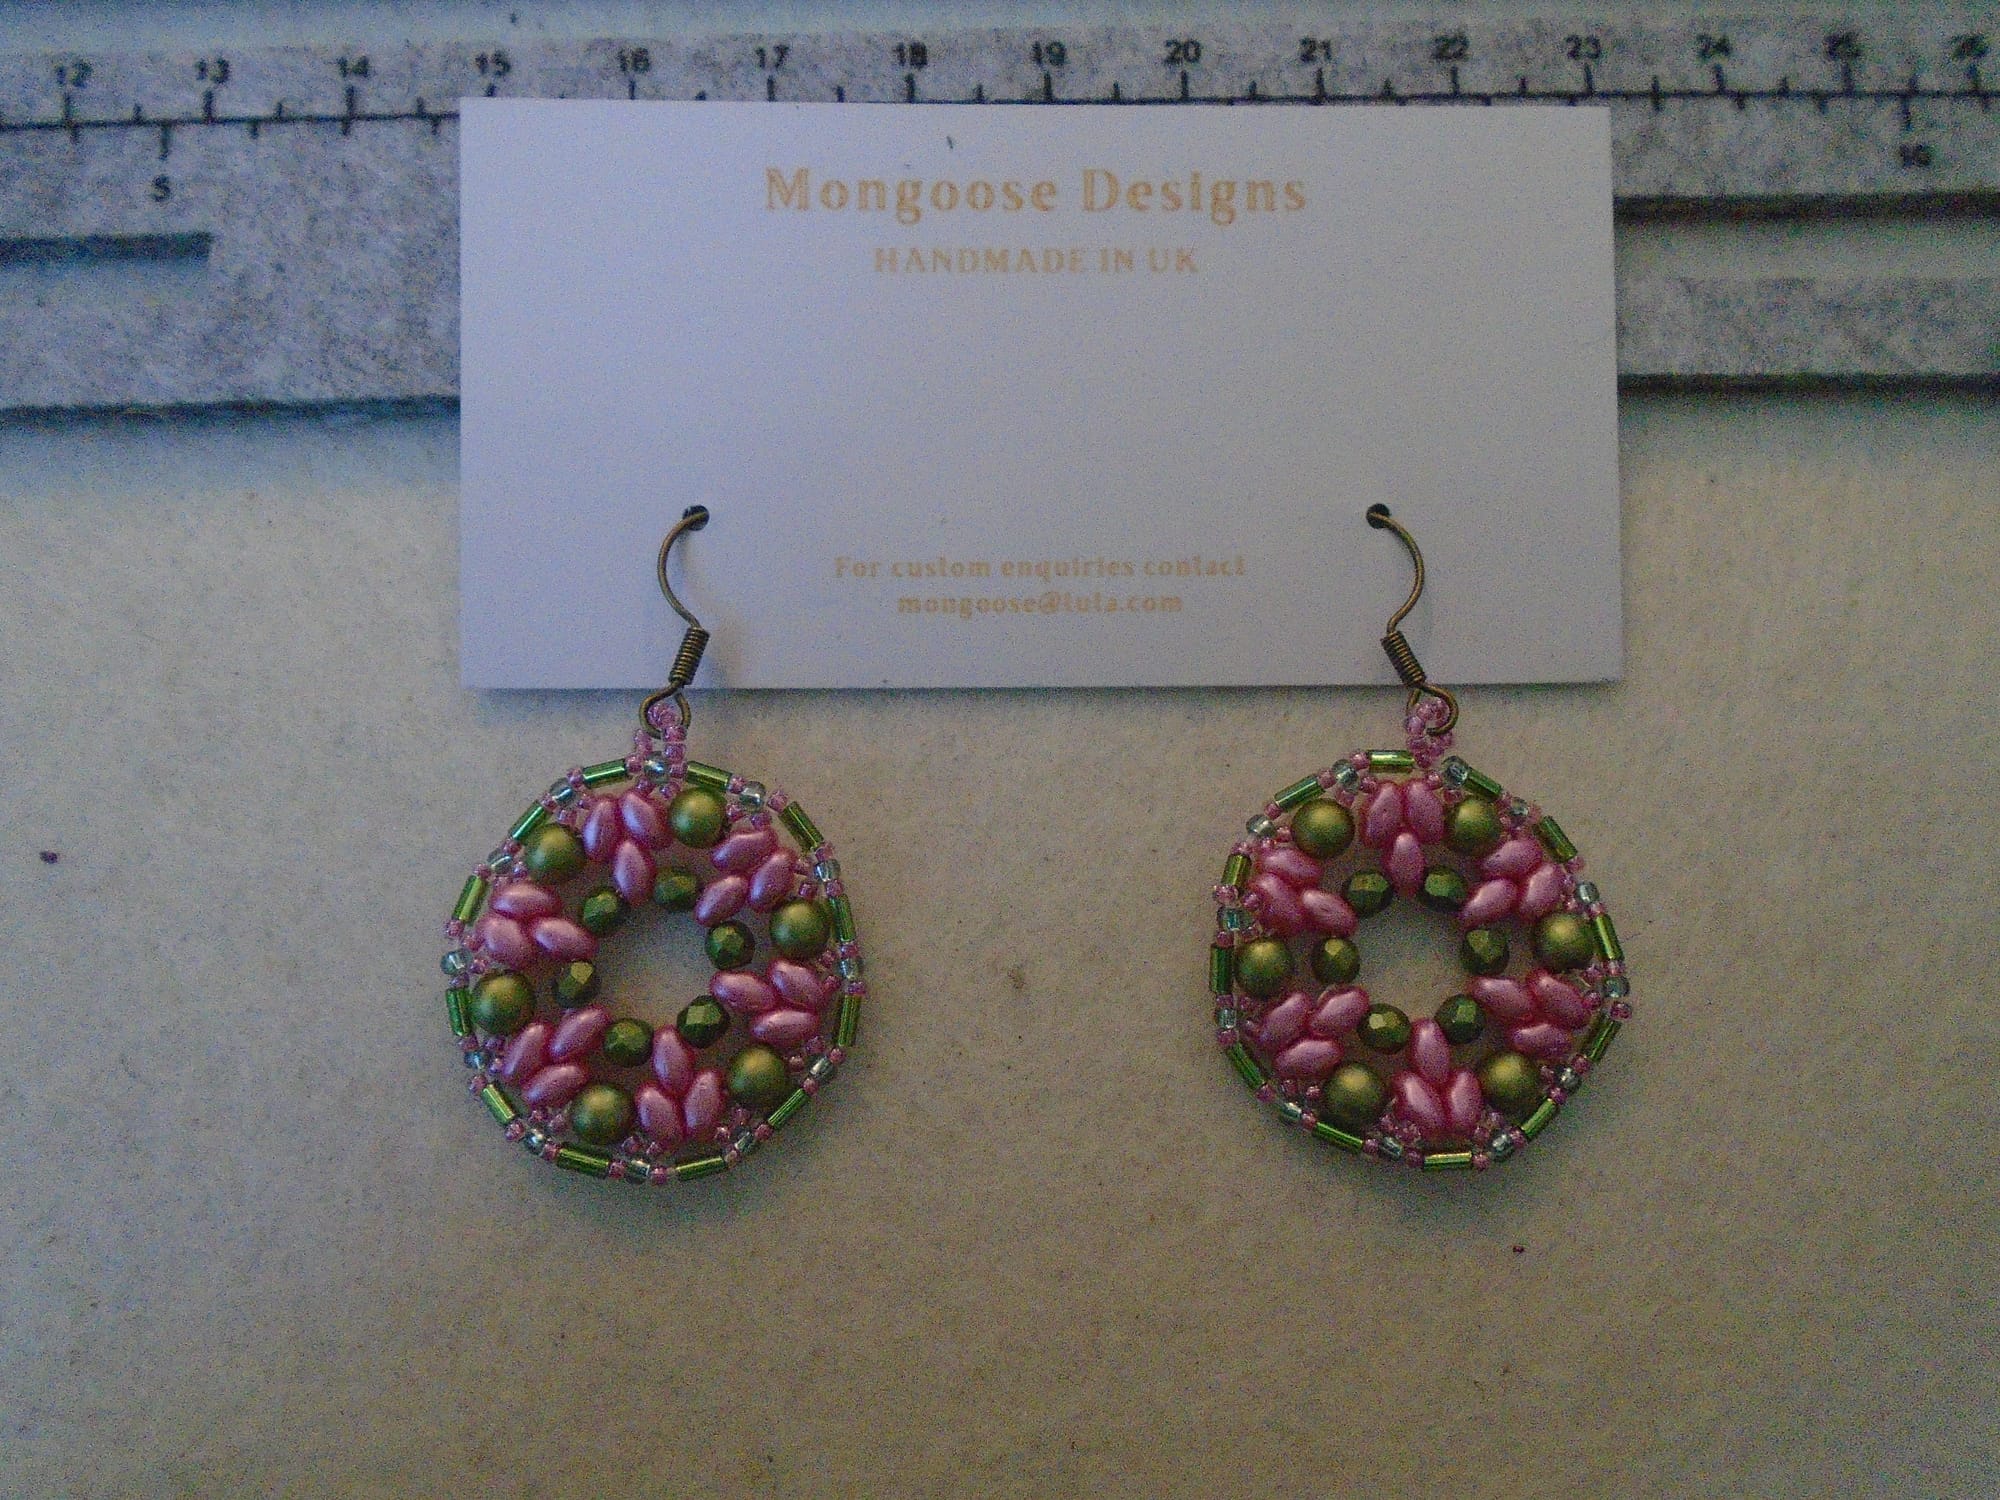
There's also a fun little trick going on here; I really wasn't sure if it was going to work, but it did. If you look very carefully, you'll see that between each pearl and the base (assuming the leaves are pointing upwards) of the adjacent trefoil, there's a three-bead picot: a sparkle grey 15/0 seed bead, then a burgundy 11/0, then another 15/0. When I put those in I had a bit of a panic because they were all over the place. But there is a thing you can do with that kind of picot. You go round the circle again, but this time you don't pass the thread through the middle bead, just the first and the last. Snug the thread into place, and you get the middle bead sitting neatly on top of the other two - in this case, all ready to take the finishing border of bugle beads (plus more 15/0s to set them off).
And I have to say, I'm not working any of this out mathematically. I'm flying entirely by the seat of my pants here.
I think I'm getting a feel for this.