Bug to feature
The thing with sewing, like pretty much any human endeavour you care to name, is that now and then it goes wrong. So I thought it might be fun to have a post about the sort of thing you might do when it does.
Very often, of course, the right answer is the boring one: you just take it all out and re-stitch. If you use a machine, you probably want a seam ripper for this, unless you can manage to pull out one of the threads, in which case the other one just goes. I don't own a seam ripper, because I've never really felt the need for one. You can pull apart a backstitched seam and cut through the stitches between the layers of fabric, and I've sometimes had to do that, but I avoid it if at all possible because it leaves a lot of tiny little ends of thread and it's a pain to get rid of them all. If I've sewn up a seam the wrong way (for instance, when I put the wings on the dragon the wrong way recently), what I normally aim to do is unpick. It's not as slow as you might think, but it is best to do it in fairly short sections and then cut the thread, otherwise you end up with tangles.
Very occasionally, it's wrong but you can get away with leaving it as it is, because nobody's going to see it. I sewed up the pockets of my first pair of Saguaro trousers the wrong way round (very easily done, because I was using plain black viscose poplin and there was no difference between the two sides of the fabric); I'd mock-French-seamed the whole lot before I realised, so there was no taking it out again (certainly not on a fabric like that - might have got away with it on cotton poplin, but viscose poplin, as I've mentioned before, frays like billy-o). And I thought "drat, do I cut another set of pockets?" Then I almost immediately realised that there was no need. The seams were inside the pockets. They wouldn't show. Phew.
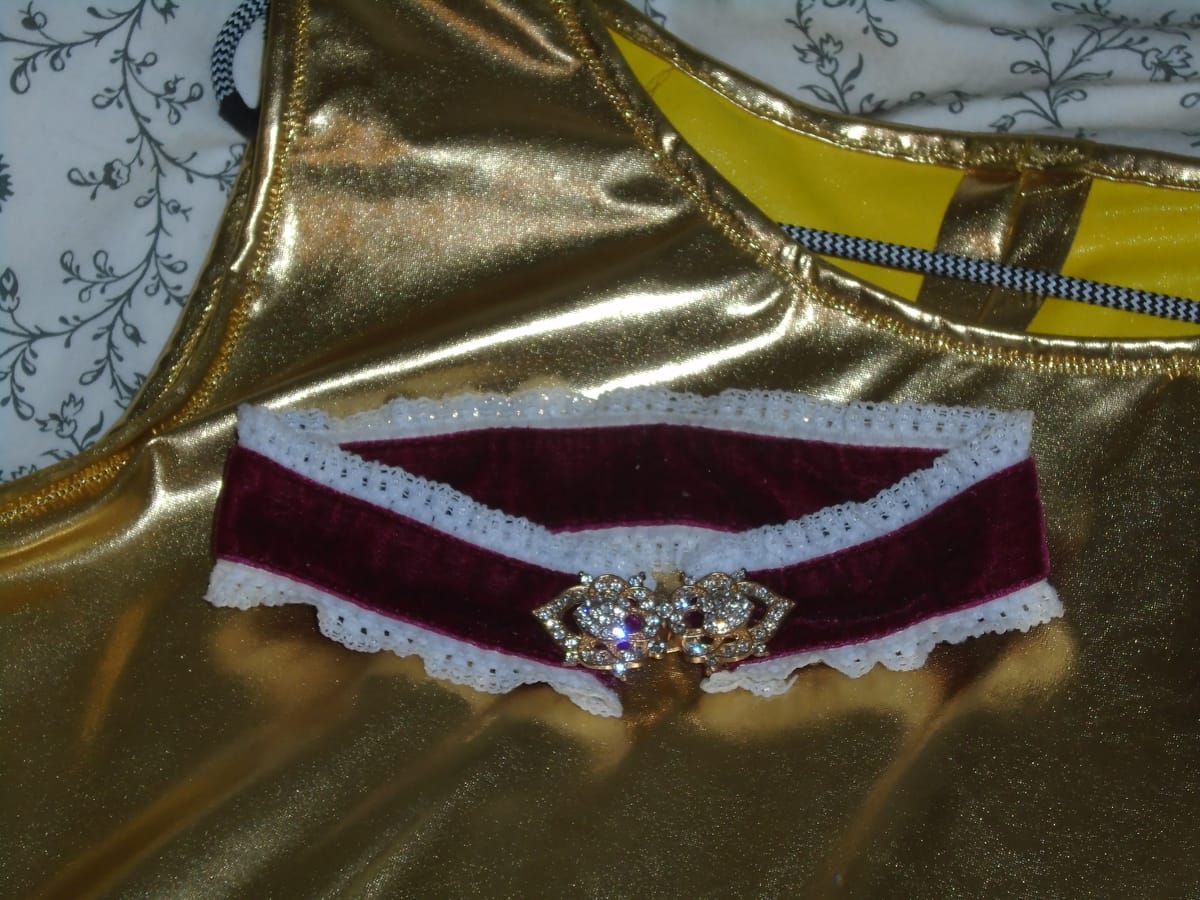
But there are also times when you can convert a bug into a feature. The two items shown in the feature photograph are my favourite sewing rescues of 2024. Let's look at the velvet choker first.
A velvet choker is a fun accessory and very easy to make. You take a length of ribbon, seam the ends together, flatten it out so the seam is central (or near enough - it's not going to show, so it doesn't really matter where it is, as long as it's on the inside), then sandwich lace between the two thicknesses of ribbon and sew it all together. Simple, but effective, and if you're doing it by hand you can make it so that the stitching is barely visible, if you so choose. (I tend to go for a more topstitched look, but that's just me.) There is, however, one little problem that I wasn't aware of when I blithely pitched into making the burgundy choker shown here; and that is the fact that sewing the lace in tends to pull in the length slightly. It's so subtle that it's difficult to see in the photo; it doesn't look appreciably gathered.
Nonetheless, you don't have much tolerance on a choker. It's not like, say, an elasticated waistband, where as long as you can still get it over your hips it doesn't really matter if it's a little shorter than it's technically supposed to be. I measured my neck and added what I thought was a fairly generous 5 cm overlap for a magnetic fastening, but before I'd even finished sewing it up it was clear that I'd be lucky if it even met in the middle, let alone overlapped. And, indeed, it did not. There was quite a significant gap.
I thought "maybe two buttons joined with some kind of decorative loop?". And then I remembered I had that frog fastening. It was something I'd bought on eBay a little while previously without any really clear idea of what for. You see, when I buy things on eBay, I quite often click on "See Seller's Other Items", especially if it's haberdashery or anything of the sort, because you can often pick up bargains like that and save on postage by getting them all sent to you in the same parcel. (This, however, is not for the faint-hearted. I've seen a few Seller's Other Items that have thoroughly boggled my mind. You think they're just selling beads, or trimmings, or accessories like fans and scarves, and then you click through and you think "?!". But often it's really useful to do that; it's how I ended up with a couple of covers for my rather battered perching stools when I was originally just looking for velvet ribbon.) Anyway, this frog fastening was a Seller's Other Item, and I remember looking at it and thinking "that is really pretty, and it's good value - it'll certainly come in for something."
And it did. It turned out to be perfect for converting a total disaster into a statement piece. It's now my favourite velvet choker.
I've already talked about the gold top in general, but I don't think I've previously shown you such a clear photo of that beaded trim. I'm very happy with it; it really elevates it into something special. But, again, it was a rescue, and this time the problem was that plain non-metallic sewing thread, even in a pretty similar colour, looks rather unimpressive on metallic gold fabric... but I had to topstitch the edging bands to flatten them down, because you couldn't apply enough heat to press them flat without risk of damage to the fabric. (And, to be honest, I wouldn't want to press it on the right side in any case, at least not without a press cloth.) And, while I was wondering what on earth to do, I thought, "oh yes - I have a tube of gold seed beads."
So there you have it. Topstitching with beads. One bead per stitch. It took ages. I do at some point plan to make another of these in black, but that's a lot more forgiving of matte topstitching, and in any case I'm not going to be using the bands, because in that type of fabric they are somewhat bulky and very awkward to sew. It'll be stretch bias binding all the way. Still, it's a very useful technique to have up one's sleeve, and I'm not going to rule out the possibility that I may one day do it again on a fabric that doesn't strictly need it. Or, you know, you could do a line of topstitching and then just oversew the beads to it, so that the central channels of the beads point across the stitching rather than along it; I don't know whether or not that would be quicker, but it would be a slightly different look.
We all have occasional disasters. But, at least when you're sewing, a disaster doesn't have to remain a disaster!