Bobbin up and down
Many years ago, I used to make bobbin lace; and then the furry gentleman in my icon walked into my life, along with his brother. The furry gentleman in the icon was called Minsky, and he was by far the most intelligent cat I've ever had the privilege of knowing; his brother Chomsky, by contrast, turned out to be embarrassingly misnamed. There were two cats, and there were two brains, and Minsky got both of them. Don't get me wrong, they were both lovely, but nonetheless one had to work differently around them. While Minsky could quite happily sit on my lap whatever form of craft I was doing, and had the good sense to know that if he didn't interfere I wouldn't throw him off, Chomsky could no more resist dangly bobbins than a moth can resist a bright light. And that was why I had to give up making lace, much as I enjoyed it. Some eighteen months later, Chomsky and Minsky were joined by another pair of feline siblings, who were originally named Klinsmann and Bierhoff until it became apparent that Bierhoff was in fact a little girl (they were both ginger, so naturally I thought I had two ginger toms), so she was hastily renamed Heidi due to her penchant for disappearing into convenient Heidi-holes. Klinsmann and Heidi both turned out to be even more awkward than Chomsky when it came to doing crafts around them; they had a good deal more energy than he did. Somehow I still managed to keep the sewing going, not to mention cross stitch, but it took a certain amount of ingenuity.
Anyway, if you don't have cats, bobbin lace is an extremely satisfying craft. To start with, you need a lace pillow; traditionally this was rather like a bolster stuffed to the limit of its capacity with horse hair or similar, because a lace pillow has to be firm enough to take pins without having them move about. Modern ones are often quite large, dome-shaped, and made from expanded polystyrene (this was what I had). Expanded polystyrene on its own isn't very nice, so you cover your pillow with a large cloth and make the lace on top of that.
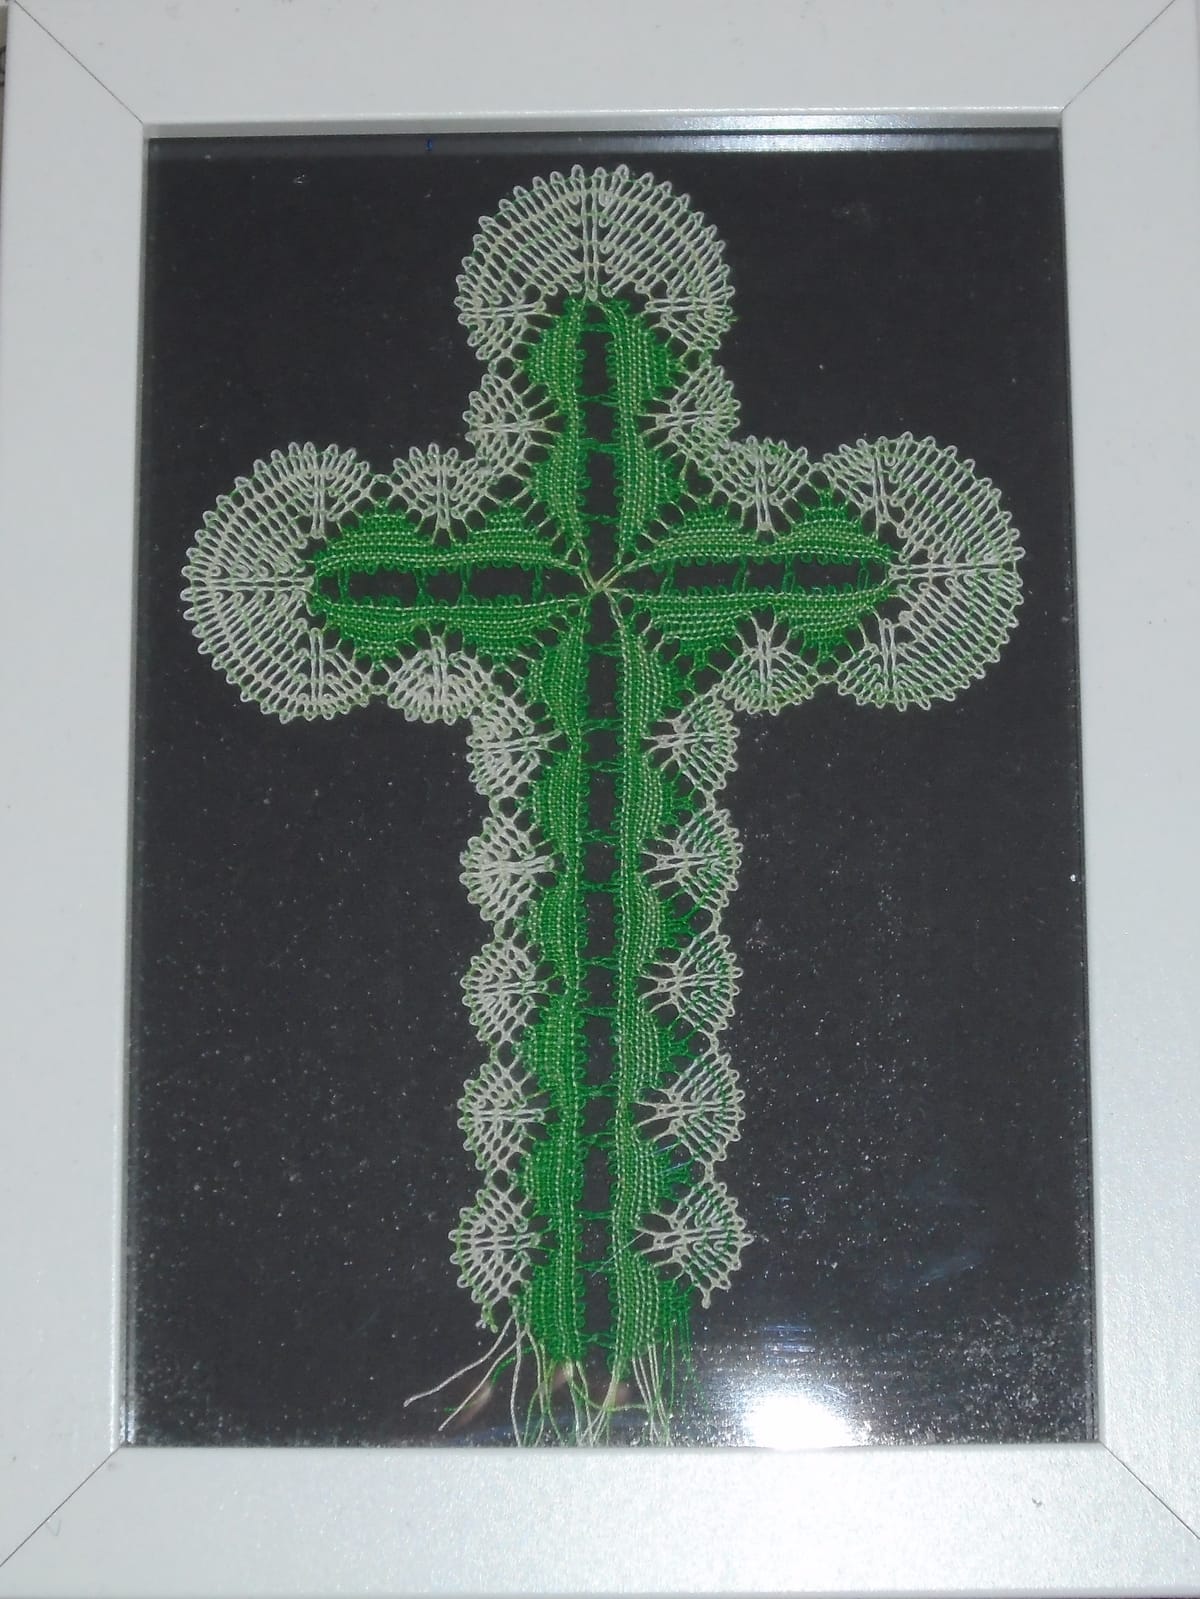
Next, you need a pattern, which consists of one or more pieces of thin card with dots marked for the positions of the pins. For a single small piece like the one photographed (made by a close friend from church), one piece of card is enough, but if you are going to make something like a lace border you will need at least two pieces so that you can keep moving them as the lace grows. Pinholes in thin card are inclined to get bigger if you keep re-using the pattern; one effective way round this is to cover the card with self-adhesive plastic film. Specialist lacemaking suppliers sell film specifically designed for the purpose; it is matt to ensure that light reflections don't disrupt your view of the pattern.
You also need a lot of pins. It's possible to use ordinary dressmaking pins, and they will work well if the thread you are using is not too fine, but for best results one should use lace pins, which are smaller and finer than regular pins. (They are also excellent for pinning delicate fabrics when sewing them.)
And, finally, you need your bobbins; how many of these you need depends very much on the pattern, but I don't think I ever made a piece that needed fewer than eight pairs, and it's easy to find patterns that require a lot more than that. Most bobbins come with a hole drilled through the non-business end, and that's all. You will require a little bit of weight on that end, and it also helps if that weight looks the same for both bobbins in a pair but different from the others, as it makes it easier to keep track of pairs. So what you do when you buy a new pair of bobbins is to "spangle" them. This means you take a few beads - the same for each of the pair - and a little bit of jewellery wire, thread the beads on the wire, and fasten the wire in a loop through the hole provided. Bobbins are traditionally made of wood, but I've seen plastic ones. I avoided those. I much prefer the feel of wood, plus it's much more sustainable.
The basic technique is very simple. You first wind each pair of bobbins in exactly the way I described in an earlier post for kumihimo bobbins, and hang it over a pin. Once all the bobbins are set up, you exchange them in pairs. The precise details of how you exchange them varies according to the stitch you are using, but once you get into the swing of it - which is very quick - you can do it pretty much automatically. And whenever there is a turning point in the pattern or the threads need to be temporarily anchored for some other reason, you put in another pin, so that after a while you have a few centimetres of very closely packed pins sticking out of your lace pillow like a hedgehog's spines. By this point, the lace at the top of the pins is stable without them, so every so often you take out a few pins at the top so that you have more pins to put in at the bottom as you work; and so on.
Traditionally, bobbin lace is made using a fine linen thread, and I usually did. However, if you want to do colourwork like the cross shown above, ordinary sewing thread works very well. On one occasion I needed a couple of slips, and I had very little money at the time, so I bought some lining fabric in a sale. I strongly suspect it was reduced because of the colour, since it was a rather intense and slightly salmony pink. However, for a slip the colour didn't really matter, and I decided, just for fun, that I would make a matching lace trim for them. After all, I had to buy matching thread anyway to sew them up. I ended up with two nice slips for probably about £5, and nobody would ever have guessed.
I'm quite tempted to take it up again. The only thing is, I live in a ridiculously small flat these days, and I'm not sure where I'd even put a lace pillow...