All square
So I have finally got to the point in Mr Holdgate's book that I wanted it for in the first place, namely square-mesh netting. (I did, I admit, skip the bag with the cane handles, largely because I didn't have any; though it was labelled as an extra rather than an essential. It is also possible to use the same technique on rope handles, but, to be honest, by the time I've gone to the trouble of making a pair of good rope rings, I might as well just be finishing with half hitches in the usual way.) Not that I regret the journey in any way. I've learnt a number of useful techniques I didn't previously know, and in particular the food bank is overjoyed about the string bags.
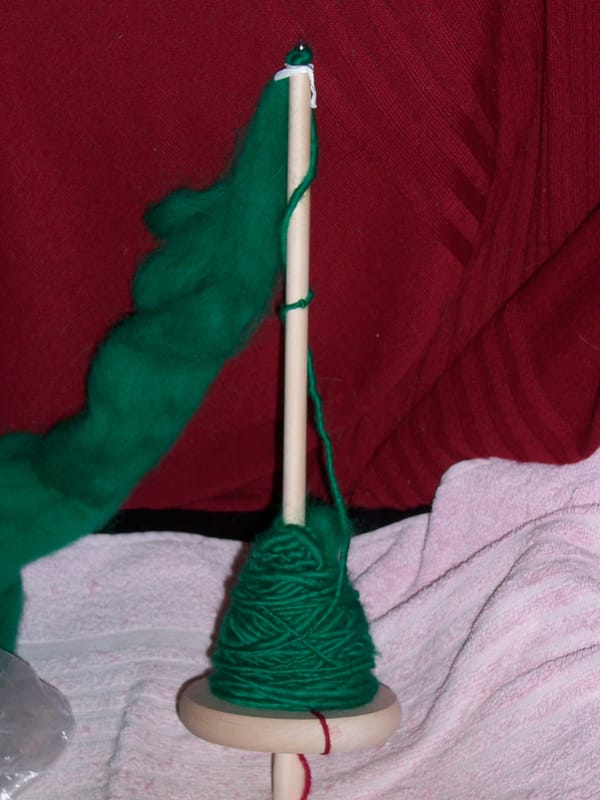
What you see here is what you might call a wearable practice piece. I'm not going to be doing filet work on this one because the mesh is still rather too coarse, though it is a lot finer than I've been doing up to now. The thread is Twilley's Goldfingering in Spruce Green, and I expect I shall look very spruce indeed in the resulting shawl; I don't normally buy Goldfingering as it is quite expensive for what it is, but it's significantly cheaper if you can get it on a cone, as I have on this occasion.
I'm using the medium netting needle here, and, as you see, I'm meshing on a lollipop stick. I have these in two different sizes, sourced, like many other things, from eBay. The seller claims that they are very smooth and therefore safe for children; and this is true, as far as it goes. I could quite happily let children play with them without worrying about anyone getting a splinter stuck in their finger. However, it should perhaps be noted that "smooth enough not to give someone a splinter" and "smooth enough to be used as a mesh stick" are not quite the same thing... and this is where a small piece of sandpaper is your friend (fortunately I still have the one that came with Gisele). The tiniest irregularity is prone to catch on things, especially if you're using something like Goldfingering, which is a chainette construction and therefore will catch if there is anything at all for it to catch on.
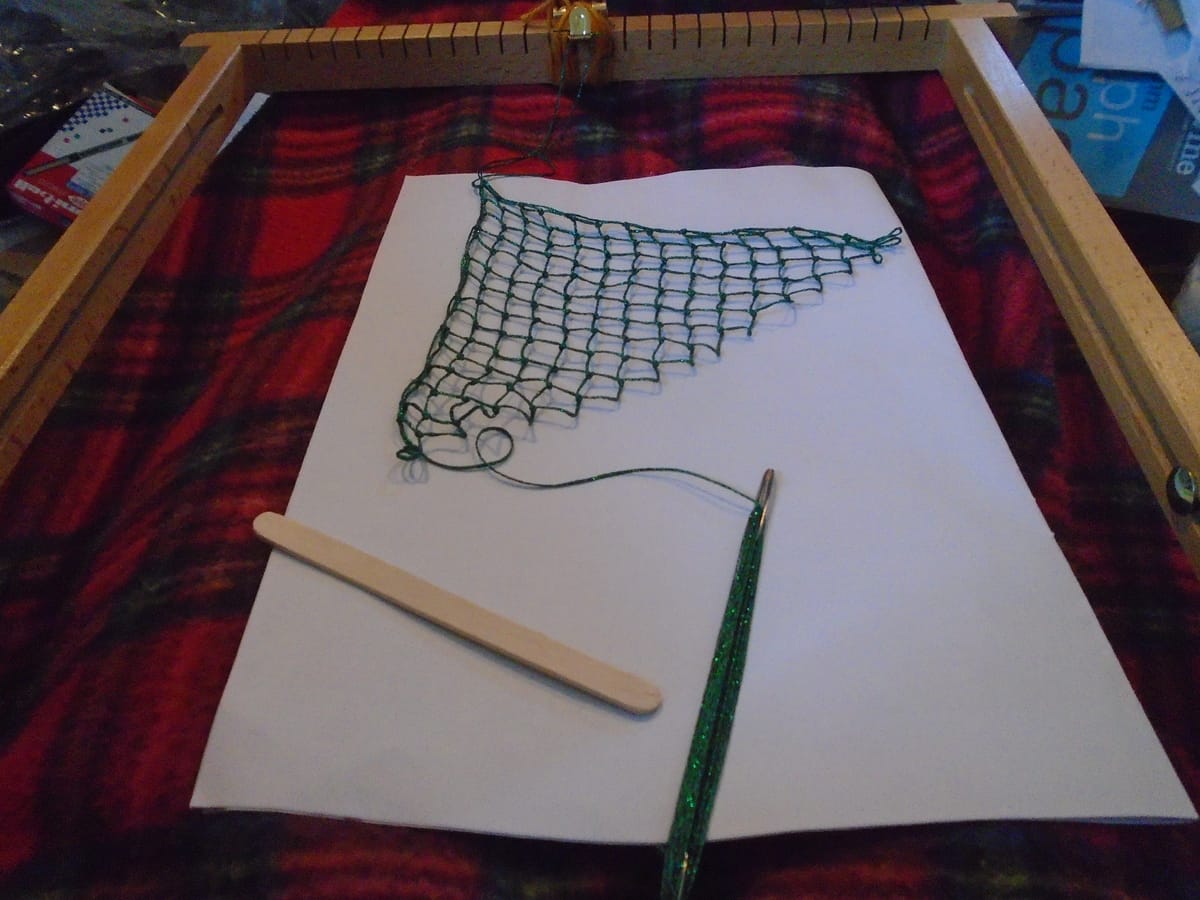
On that note, I'm still using the folding ruler for the string bags (which is not ideal, but I can't find one a similar size that doesn't fold). I also have a metal thing with a straight paddle-shaped end, a little narrower than the smaller lollipop stick pictured above. It is intended to be a sculpting tool, but I am fairly laughably bad at sculpture, so I see more future for it as a mesh stick, and I'm planning to try it out with the 8-lea linen. However, I could still do with something even finer, maybe about 5 mm wide; if anyone has any suggestions, please do let me know. (I should also specify that it has to be flat, otherwise I could just use a knitting needle. You need the loop from the row above to butt up against the edge, otherwise you lose accuracy.)
Anyway. Square-mesh netting is exactly the same as ordinary diamond-mesh netting; you do it the same way. The difference is in how it's set up. With square-mesh netting, you're working from one corner, and because of the way it's constructed you get that nice neat double selvedge. Well, I say double, because Mr Holdgate calls it that; in fact, if you look closely, it's double and triple on alternate squares.
You need to start with a separate foundation loop. Mr Holdgate doesn't specify whether you use the same string/thread or a different one, so I read ahead a bit and realised that using the same thread as I was going to use for the body of the piece was probably going to save me some trouble; so that was what I did. What he does specify is three inches. I don't know what three inches looks like and couldn't be bothered to convert, so I just made it a convenient size to work with, which is really all that matters. You then anchor this loop as usual and knot the end of your working thread into it with a netting knot, leaving a short tail; he said three inches again, at which point I began to be reminded of the Caterpillar from Alice in Wonderland, so again I went and read ahead to find out what you do with this tail at the end. The answer is you tie it off, so I just left a suitable length for doing that. And once your thread is tied in place, you mesh twice into the foundation loop. These two loops are the start of your selvedges; you don't have a square mesh yet, but you will on the next row.
At this point it's probably a good idea to let one of Mr Holdgate's diagrams do the talking. I have added some labelling in red, just for clarity; with the accompanying text it's perfectly clear, but the extra labelling helps when the diagram is standing alone.
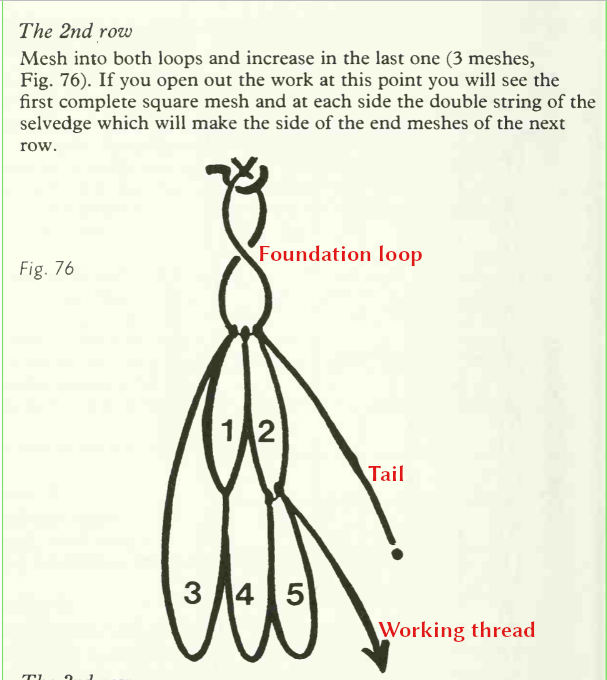
As Mr Holdgate points out, if you open out the work you will see the first complete square mesh, which is the one labelled 4 in this diagram. Note that netting is pretty nearly always worked from left to right (you can do it the other way, and indeed I have at a pinch, but left to right is a lot easier); so, for the first row, the foundation loop wasn't twisted into a figure-8, and the loop labelled 2 here was worked before the loop labelled 1. Netting is like knitting in that it's back-and-forth (or, if you like fancy words, "boustrophedon", which literally means "in the manner of an ox ploughing"), and you turn the work round at the end of every row if you're doing a flat piece.
And then you just keep going like that, working one increase at the end of each row, and - at least if you're me - trying to remember to turn the work in opposite directions each time so that the foundation loop doesn't end up twisted like a pretzel. My shawl is going to be square, which is the obvious shape for a shawl, so I am not going to have to do anything clever. Once the first two sides are long enough (they are about 18 cm in the photo, so I have a way to go yet), then all I need to do is start decreasing, rather than increasing, at the end of each row. For a rectangle, however, it's a little more complicated. Once your sides get to the length you want the shorter side, you start decreasing on one side as for a square, but then you continue to increase on the alternate rows until you reach the length of the longer side on that side, at which point you then start decreasing on both sides. Trust me, it works. Mr Holdgate helpfully recommends putting a marker on one side so you know which side is which. That, I feel, is wisdom.
Ah. It occurs to me that I could use the "cane handles" technique if that child in the flat opposite comes to me wanting me to repair his goal net. I am not the child's biggest fan, but I will repair it if he asks, I promise. On one condition... that he stops leaving in in the middle of the back lawn!